You have a set of cPanel accounts on an old WHM server, a new server ready to receive them, and about a week to plan the move. The copy itself usually works; what goes wrong is switching DNS while resolvers still remember the old address, or before the last orders and email were copied. The fix is a timeline with one check per step, starting with an inventory at T−7 and a lower DNS TTL (time to live, how long resolvers may cache an answer) at T−3. At T−2 you move one canary account, a real account moved first as a test, and at T−0 you do the final sync and switch DNS. The old server stays your way back until T+2.
The click-by-click procedure for one account is in moving a cPanel account with the WHM Transfer Tool. The server-level pieces the tool leaves behind, such as hooks, are in whole-server migration with whmtransfer. This article is the schedule that ties them together.
What you’ll accomplish
- A written inventory of where the old and new servers differ.
- DNS answers that expire within five minutes, so a switch or a reversal is fast.
- One canary account moved and tested on the new server while the public still sees the old one.
- A final sync method chosen in advance: a fresh transfer, or a pre-copy followed by a delta sync.
- A rollback point until T+2, and checks that prove the move is finished.
Prerequisites
- Root SSH access to both servers, and root access to WHM on the new one. The Transfer Tool runs on the destination and pulls from the source.
- The new server runs the same cPanel & WHM version as the old one or a newer one. cPanel’s migration guide asks for matching software on both ends, and it warns against moving calendar and contact data from version 120 or later to 118 or earlier.
- Access to wherever each domain’s DNS is actually hosted. That might be the old server, a DNS cluster, a registrar or a provider such as Cloudflare. Step 4 shows which.
- Commands match current cPanel & WHM releases on AlmaLinux 8 and 9; output can differ slightly between versions.
How it works
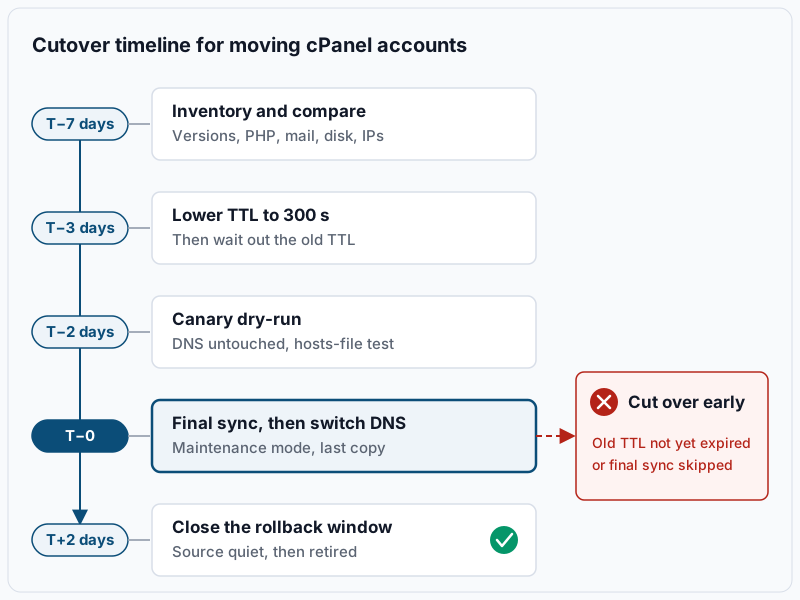
The timeline has one dangerous moment: T−0. Every earlier step can be repeated without anyone noticing, because the public still reaches the old server. After T−0, new orders and email land on the new server, and going back means carrying that data with you.
Two mistakes turn T−0 into an outage. Switching before the old TTL has expired splits visitors between both servers, and each takes writes the other never sees. Switching before the final sync makes the new server serve a stale copy. WHM gives you two ways to make that final copy.
| WHM Transfer Tool | /scripts/pkgacct + /scripts/restorepkg | |
|---|---|---|
| Where it runs | On the destination, pulling from the source over SSH | You package on the source, copy the archive, restore on the destination |
| Many accounts | One queue, with packages and feature lists | One account per command, so you script a loop |
| DNS and mail switch | Live Transfer can repoint the source’s DNS and MX, forward requests, recopy mail and suspend the source account | Nothing; you change DNS yourself |
| No direct network path | Needs SSH from the new server to the old one | Works with any copy method, even an external disk |
| Account already on the destination | Pick Overwrite or Overwrite with Delete, or the account fails to transfer | Terminate the destination copy first |
Live Transfer replaced the older Express Transfer option, and cPanel’s documentation says the interface enables it by default. That matters for the canary. With it on, the old server repoints the account’s DNS and MX (mail exchanger) records and suspends the account as soon as the copy finishes.
Step-by-step
-
T−7: Record versions on both servers. Run each command on the old server and the new one, and write both answers side by side.
/usr/local/cpanel/cpanel -V
mysql -V
Example output (old server):
110.0 (build 48)
mysql  Ver 15.1 Distrib 10.3.39-MariaDB, for Linux (x86_64) using readline 5.1
The cPanel version on the new server must be equal or higher. A database jump, such as MariaDB 10.3 to 10.11, usually restores fine but can break old SQL modes and collations (the rules a database uses to sort and compare text). If major versions differ, read MySQL version mismatch during a migration before the canary.
-
T−7: Compare PHP versions and handlers. List the installed PHP versions, then which version each site uses.
whmapi1 php_get_installed_versions
whmapi1 php_get_vhost_versions | grep -E 'vhost:|version: ea'
Example output (abridged):
    - ea-php74
    - ea-php81
      version: ea-php74
      vhost: acme.example
Every
ea-phpNNa site uses on the old server must exist on the new one. If it won’t, plan that upgrade separately; a PHP version jump during a migration explains why. -
T−7: Copy the EasyApache profile. EasyApache 4 is the cPanel tool that builds Apache and PHP from a list of packages, saved as a JSON profile. On the old server, save the current setup as a profile:
/usr/local/bin/ea_current_to_profile --output=/etc/cpanel/ea4/profiles/custom/old-server-ea4.jsonThe file name must end in
.json. Copy that file to/root/on the new server. Run the install command there once without--install, which only shows the changes it would make:/usr/local/bin/ea_install_profile /root/old-server-ea4.json /usr/local/bin/ea_install_profile --install /root/old-server-ea4.jsonRead the preview before you run the second line, which provisions the profile. Packages that do not exist for the new OS are usually old PHP versions or extensions, and you will need to replace them.
-
T−7: Check mail routing, DNS hosting, IPs and disk. On the old server:
cat /etc/remotedomains
ls /var/cpanel/cluster/root/config/ 2>/dev/null
whmapi1 listaccts | grep -E ' user:| ip:'
du -sh /home/*/ | sort -h | tail -5
Domains in
/etc/remotedomainsreceive mail elsewhere, such as Microsoft 365, so their mail does not move. If the cluster directory lists any entries, the server is in a DNS cluster (servers that share zone files). Note which accounts use a dedicated IP, and make sure the new server has a free IP for each of them. On the new server,df -h /homeshould show room for all the accounts you are moving, plus the archive space cPanel asks for: more than twice the largest account, plus 1 GB.Finally, find out who answers DNS for each domain:
dig +short NS acme.exampleIf the answer names the old server’s nameservers, you control the switch from WHM. If it names a provider, you will change records there at T−0.
-
T−3: Lower the TTL to 300 seconds. Check the current value first:
dig +noall +answer acme.example AExample output:
acme.example. 14400 IN A 203.0.113.10The second column is the TTL in seconds; 14400 (four hours) is the cPanel default. In WHM » DNS Functions » Edit DNS Zone (or at your DNS provider), set the TTL of the A, AAAA, MX and
wwwrecords to 300. Run thedigagain; the TTL column should now read 300 or less. Then wait at least as long as the old TTL before T−0. Nameserver changes at the registrar are slower, often 48 hours, so if you plan to change NS records, do it well before T−3 or keep the same nameserver names. -
T−2: Move a canary with DNS untouched. Pick a typical, low-traffic account with a database and mailboxes. In WHM » Transfers » Transfer Tool on the new server, connect to the old one, select only the canary, and switch Live Transfer off. Leave Update DNS Zone enabled so the new server builds the zone and mail routing.
Check one more thing if the old server is in a DNS cluster. If the new server sits in the same cluster and Update DNS Zone is enabled, cPanel’s documentation says the transfer replaces the old server’s zone files with the destination’s copy. The cluster then serves the new IP. That switches the domain at once, so keep the new server out of the cluster until T−0.
-
T−2: Test the canary through a hosts-file override. Without changing public DNS, ask for the site from the new server’s IP:
curl -sI --resolve acme.example:443:198.51.100.20 https://acme.example/ | head -1Expected output:
HTTP/2 200A 301 to the site’s canonical address is also fine. A 500 or a PHP error means the runtime differs; recheck step 2. For a browser test, add
198.51.100.20 acme.example www.acme.exampleto your computer’s hosts file, log in to the site’s admin, save a change and send a form. Then compare mailbox counts on both servers:doveadm mailbox status -u info@acme.example messages INBOXExample output:
INBOX messages=2381The two numbers should match. Remove the hosts-file line when you are done, or you will keep testing the wrong server later.
-
T−1: Choose the final sync method. For accounts of a few gigabytes, use a fresh transfer at T−0. Terminate the canary copy on the new server (
whmapi1 removeacct username=acme), then transfer everything with Live Transfer on. Accounts that take hours to copy are better pre-copied now with Live Transfer off; at T−0 you copy only what changed (step 10). Tell site owners when the T−0 window is and that edits made during it may be lost. -
T−0, path A: Fresh transfer with Live Transfer. Put dynamic sites in maintenance mode so the database stops changing. Run the Transfer Tool with Live Transfer enabled. As each account finishes, the old server repoints its A and MX records and forwards stray web and mail requests. It then copies the mailboxes once more and suspends the account. If DNS for the domain lives at a provider and not on the old server, change the A and MX records there now.
-
T−0, path B: Delta sync after a pre-copy. Put sites in maintenance mode, then pull the files and mail that changed, from the new server:
rsync -aH --delete root@old.example.net:/home/acme/public_html/ /home/acme/public_html/
rsync -aH --delete root@old.example.net:/home/acme/mail/ /home/acme/mail/
Rsync prints nothing on success;
echo $?should return0. Then copy each database again, replacing the pre-copied tables:ssh root@old.example.net "mysqldump --single-transaction --routines acme_wp" | mysql acme_wpmysqldumpaddsDROP TABLE IF EXISTSbefore each table by default, so the import replaces the old copy. Now change the A, AAAA and MX records to the new IP. After the switch, run the mailrsynconce more without--delete, to pick up messages that reached the old server in the last minutes. -
T−0 to T+2: Hold the rollback point. Decide in advance what sends you back, for example: checkout or login broken and not fixed within 60 minutes. Rolling back means unsuspending the source account (
/scripts/unsuspendacct acme), pointing DNS back, and copying any orders or mail that landed on the new server. The rollback plan for a failed cutover covers that in detail. At T+2, if nothing still reaches the old server, close the window and raise the TTL back to 3600 or 14400.
Validate it works
Check that the public now sees the new server:
dig +short acme.example A @1.1.1.1
dig +short acme.example MX @8.8.8.8
Both should point at the new server’s IP or mail host within five minutes of the change.
On the old server, confirm that traffic is draining:
tail -n 20 /var/log/apache2/domlogs/acme.example-ssl_log
grep acme.example /var/log/exim_mainlog | tail -n 5
New lines should stop within an hour, apart from bots with stale caches. On the new server, check that backups are on in WHM » Backup » Backup Configuration. Then run AutoSSL, cPanel’s free certificate service, for each user:
/usr/local/cpanel/bin/autossl_check --user=acmeSend a message from an outside mailbox and confirm it arrives. Update SPF records (the DNS entry listing which servers may send your mail) that still name the old IP. Ask your provider to set reverse DNS (PTR) for the new IP so outgoing mail is not flagged as spam.
Troubleshooting
- The canary went live by itself. Live Transfer was left on, or the new server was already in the DNS cluster. Repoint the record to the old IP, unsuspend the account on the old server, and redo the canary with Live Transfer off.
- The username shows in red in the Transfer Tool. The account or domain already exists on the new server, usually from the canary or a pre-copy. Choose Overwrite or Overwrite with Delete, or terminate the destination copy and transfer again.
- A database arrived with a different name. The Transfer Tool renames an incoming database whose name already exists on the destination, so the site reads the old copy. Remove the old database and transfer again, or use the
mysqldumppipe from step 10. - Some visitors see old content after the switch. A resolver still holds the old answer because the TTL was lowered too late. Keep the old server read-only and wait out the original TTL.
- Mail delivered to the old server after the switch. Run the mail
rsyncwithout--deleteagain, and check that the MX record and/etc/localdomainson the new server list the domain.
When this is the wrong approach
- A single urgent account with no maintenance window fits Live Transfer on its own, with no canary schedule.
- If the OS, PHP major version and database engine all change in the same move, split them so a failure has one cause.
- When the old server is compromised, do not copy accounts blindly. Clean and audit first, or rebuild sites from known-good backups.
Official references: the WHM Transfer Tool documentation and its select what to transfer page, which lists the Overwrite and DNS options. When the move is done, clean up the old server before you cancel it.
If this is the kind of work you’d rather never own again, it’s the daily job of Managed Cloud Ops — book an infrastructure review.