This guide is for WordPress site owners and admins on cPanel hosting. It fixes the error “The link you followed has expired.” You usually see it right after you upload a theme, plugin or large media file, and nothing gets installed. In most cases the file is bigger than PHP’s post_max_size limit, so PHP throws the whole upload away before WordPress can read it. The fix is to compare the file size with the account’s PHP limits, then raise post_max_size and upload_max_filesize in cPanel’s MultiPHP INI Editor. When you finish, the upload goes through and WordPress shows the new theme, plugin or file.
What you’ll accomplish
- Understand why a large upload produces an “expired link” message instead of a size error.
- Read the real PHP limits that your site uses, not the ones the command line shows.
- Raise
post_max_sizeandupload_max_filesizewith values based on a clear rule. - Pick the right settings file for your PHP handler, and avoid the
.htaccesschange that breaks sites with a 500 error. - Install a large ZIP another way when you cannot or should not raise the limits.
Prerequisites
You need a WordPress administrator account and access to the cPanel account that hosts the site. SSH access is helpful for the checks with WP-CLI (the WordPress command-line tool), but you can do every fix from cPanel alone.
The steps assume a current cPanel version with EasyApache 4, which installs PHP versions named ea-php81, ea-php82 and so on. Each domain can run a different PHP version, so note which one your site uses. You can see it in cPanel under Software > MultiPHP Manager.
It also helps to know your PHP handler. The handler is the way the web server runs PHP. Common ones on cPanel are PHP-FPM (a separate pool of PHP processes), LSAPI on LiteSpeed or CloudLinux, and the older DSO (PHP loaded inside Apache). Your host can tell you which one runs your domain. On a server you manage yourself, WHM shows it under MultiPHP Manager.
How it works
When you upload a ZIP from Plugins > Add New > Upload Plugin, your browser sends one large POST request. A POST request is how a browser sends form data to the server. The request holds the file plus a few small form fields. One of those fields is a nonce, a one-time security token that WordPress puts into every admin form to prove the request came from you.
The request passes through several size checks, as the diagram shows.
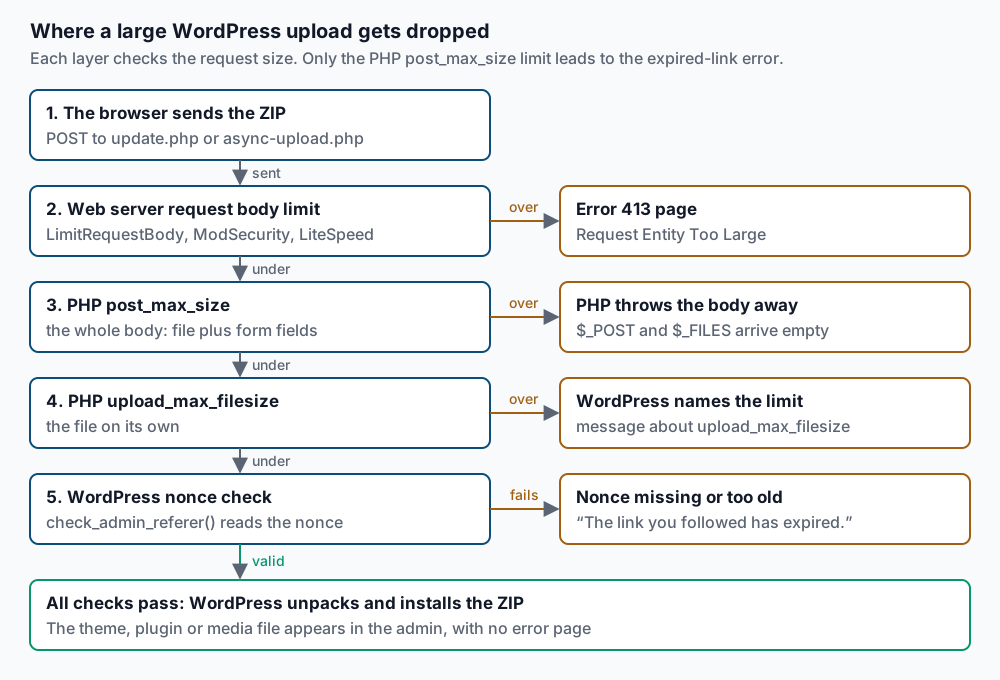
The key step is post_max_size. When the full request body is larger than this value, PHP drops all of it. WordPress then receives an empty form, with no file and no nonce. Its security check, check_admin_referer(), finds no valid nonce. It stops with “The link you followed has expired.” The message talks about an expired link because WordPress cannot tell a missing nonce from an old one.
The other limits behave differently, which helps you find the cause:
- If only the file is larger than
upload_max_filesizebut the body fits inpost_max_size, the nonce survives. WordPress then shows a clear message that the file exceeds theupload_max_filesizedirective. - If the web server limit is lower than both, you get an HTTP 413 “Request Entity Too Large” page, and WordPress never runs. Apache’s
LimitRequestBody, ModSecurity (a web application firewall) and LiteSpeed’s maximum request body size can all do this. - A nonce can also truly expire. WordPress nonces stay valid for 12 to 24 hours, so a tab left open overnight can fail the same way with a tiny upload.
Step-by-step
1. Check the size of the file you are uploading. On your own computer, look at the file’s properties, or run this in a terminal.
ls -lh my-theme.zipThe size column shows something like 87M. Write it down. The upload request is a little larger than the file, because the browser adds form fields and boundaries around it.
2. Read the limits WordPress sees. In the WordPress admin, open Media > Add New. Below the upload box, WordPress shows “Maximum upload file size: 64 MB.” WordPress computes this as the smaller of upload_max_filesize and post_max_size.
For the separate values, open Tools > Site Health > Info and expand the Server section. Look for these rows.
Upload max filesize   64M
PHP post max size     64M
PHP max input time    60
PHP time limit        30
If your file from step 1 is larger than “PHP post max size”, you have found the cause. Go on to step 4. If the file is smaller, skip to the Troubleshooting section, because another layer is at fault.
3. Optional: confirm from the command line. Over SSH, WP-CLI can print a value.
wp eval 'echo ini_get("post_max_size"), PHP_EOL;'It prints a value such as 64M. Be careful with this result. WP-CLI runs PHP from the command line, and that mode does not read the .user.ini file your website uses. The number can differ from what the web server applies. The same is true for php -i. If you use php -i, call the binary of your site’s PHP version so at least the version matches.
/opt/cpanel/ea-php82/root/usr/bin/php -i | grep -E 'post_max_size|upload_max_filesize'The output shows two columns, the local value and the master value. When this disagrees with Site Health, trust Site Health, because it runs inside the website.
4. Decide the new values. Use this rule, so the values fit the job without being huge.
- Set
upload_max_filesizeto the largest file you expect, rounded up. For an 87 MB theme, use128M. - Set
post_max_sizeabout 25% higher thanupload_max_filesize. For128M, use160M. It must never be lower thanupload_max_filesize. - For slow connections, set
max_execution_timeandmax_input_timeto300(seconds). This gives PHP time to receive and unpack the file.
You do not need to raise memory_limit for this. PHP writes uploaded files to a temporary folder on disk, not into memory.
5. Change the values in the MultiPHP INI Editor. In cPanel, open Software > MultiPHP INI Editor and stay on the Basic Mode tab. In the location menu, choose the domain that runs WordPress. Set upload_max_filesize, post_max_size, max_execution_time and max_input_time to the values from step 4, then click Apply.
cPanel writes the values to the settings files that your PHP handler reads in that folder. On PHP-FPM and LSAPI this includes a .user.ini file. PHP rereads .user.ini every 5 minutes by default (the user_ini.cache_ttl setting), so wait up to 5 minutes before you test.
6. If you edit the files by hand, use the right one. Some teams keep settings in files they manage themselves. Here is what each file does.
.user.iniin the site’s document root works with PHP-FPM, LSAPI and other FastCGI handlers. Use plain lines.
upload_max_filesize = 128M
post_max_size = 160M
max_execution_time = 300
max_input_time = 300php.iniin the same folder is read by some handlers too. The MultiPHP INI Editor manages it for you, so avoid editing both by hand..htaccesslines such asphp_value post_max_size 160Mwork only when PHP runs inside the web server, as with DSO (mod_php) or LiteSpeed. Under PHP-FPM, Apache does not know thephp_valuedirective and the whole site returns “500 Internal Server Error”. If you added such a line and the site went down, remove it first.
7. Try the upload again. Reload Media > Add New so the page gets a fresh nonce. Check that the maximum upload size now shows your new value. Then upload the ZIP again from Plugins > Add New or Appearance > Themes > Add New.
Validate it works
Confirm each part of the fix.
- Tools > Site Health > Info > Server shows the new values for “Upload max filesize” and “PHP post max size”.
- Media > Add New shows “Maximum upload file size: 128 MB.” (or your chosen value).
- The upload finishes with “Plugin installed successfully.” or “Theme installed successfully.”, and the item appears in the list.
- The account’s PHP error log has no new line like “POST Content-Length of 91226112 bytes exceeds the limit”. On cPanel this log is usually
error_login the site’s folder. Check it over SSH.
tail -n 20 ~/public_html/error_logNo new “exceeds the limit” line after your test means PHP accepted the full request. If you still see one, PHP is not reading your new value. Recheck the location you chose in step 5.
Troubleshooting
The site shows a 413 “Request Entity Too Large” page. The web server stopped the request before PHP saw it. On Apache this is often LimitRequestBody. With ModSecurity, the rule SecRequestBodyLimit sets the ceiling. On LiteSpeed, the server has its own maximum request body size. These are server-level settings in WHM or the web server’s own admin panel, so ask your host or server admin to raise them.
The values will not change in Site Health. On PHP-FPM, WHM can set a value for the whole pool with php_admin_value. A pool is the group of PHP processes that serves one domain. Values set this way override .user.ini, and users cannot change them. A server admin can review them in WHM under MultiPHP Manager, in the PHP-FPM settings for the domain. Also make sure you edited the folder of the right domain, and that you waited the 5-minute cache time.
Small uploads fail too, or the error appears when saving a form. The nonce really expired. This happens when a tab stays open for more than 12 to 24 hours, or after you log out in another tab. Reload the page and try again. If it keeps happening, check your caching setup. A page cache or CDN (content delivery network) that stores admin pages or pages for logged-in users serves old nonces. Exclude /wp-admin/ and logged-in visitors from the cache.
Large uploads fail only on slow connections. The upload may take longer than max_input_time or the web server’s timeouts allow. Raise max_input_time and max_execution_time to 300. For very large files, use one of the other methods below instead.
Media uploads fail with a different message. When images fail with a plain “HTTP error”, the cause is often image processing, not size. Our guide on the WordPress media upload HTTP error walks through those cases.
When this is the wrong approach
Raising limits is not always the best choice. If you need a large file on the server once, you can skip the browser upload.
With WP-CLI over SSH, install a ZIP you already copied to the server.
wp plugin install ./my-plugin.zip --activate
wp theme install ./my-theme.zip
WP-CLI prints “Plugin installed successfully.” and, with --activate, “Plugin ‘my-plugin’ activated.” These commands do not go through the web upload limits.
Without SSH, upload the ZIP with SFTP (secure file transfer) or cPanel’s File Manager. Put it in wp-content/plugins/ or wp-content/themes/, extract it there, and delete the ZIP. Then activate it from the WordPress admin.
Keep limits modest on shared servers. Very high values let one site tie up PHP workers with huge requests. If you manage the server and several accounts need bigger uploads, read our guide on raising upload_max_filesize on cPanel without affecting other accounts. The official WordPress advanced administration handbook and the cPanel documentation cover these tools in more depth.
Running WordPress that earns real money deserves an operator — Stack Harbor runs that stack under Enterprise WordPress; book an infrastructure consult.