This guide walks admins and developers through moving a WordPress site from DreamHost shared hosting or DreamPress to a cPanel/WHM server they control. DreamHost runs its own control panel rather than cPanel, so WHM’s Transfer Tool, which copies whole cPanel accounts between servers, has nothing to pull from. The short answer is to copy the site yourself over SSH, the encrypted remote shell, using WP-CLI (the WordPress command-line tool) for the database and rsync for the files. Along the way you change one setting that trips up most DreamHost moves: the database host in wp-config.php. When you finish, the site runs on cPanel, has passed a test against its real hostname, and its mail has moved too.
What you’ll accomplish
- A list of everything the DreamHost account holds for the domain, written down before anything changes.
- The files and database copied to a new cPanel account, with
DB_HOSTpointed at the local database server. - The site tested on the new server through your hosts file, a local file that overrides DNS for your computer only.
- DNS, mail and the TLS certificate moved in a planned order, with the old account closed only after a waiting period.
Prerequisites
On DreamHost you need a panel login that can manage the domain’s hosting, users and databases. You also need a user with shell access. DreamHost users come in types such as SFTP-only and shell, and only a shell user can run ssh. In the panel, find the section for SFTP or SSH users (menu names change over time) and switch the site’s user to shell access if needed. Note the server hostname the panel shows for that user; this guide calls it DHHOST and the user DHUSER.
On the destination you need WHM root access or an existing cPanel account for the domain (called CPUSER here). The account needs SSH access, and wp should be installed on the server. The WP-CLI command reference and the cPanel API documentation describe every command used below. Replace example.com with your domain and NEWIP with the cPanel server’s IP address.
Check the PHP version on DreamHost, which the panel shows per domain, and set the same version in cPanel’s MultiPHP Manager. Plan for mail too. If the domain uses DreamHost mail, write down every mailbox, alias and forwarder now. For mailboxes, imapsync must be installed on some Linux machine you control.
Lower the TTL (time to live, how long resolvers may cache a record) on the domain’s A, AAAA and MX records to 300 seconds, at least 24 hours before the cutover. If the DNS editor you use has no TTL field, move DNS hosting to a provider that has one a week ahead. The pre-cutover TTL lowering plan covers the timing.
How it works
A DreamHost site is spread across more places than a typical cPanel account. The files live in your user’s home directory, in a folder named after the domain, such as /home/DHUSER/example.com. The database does not run on the web server. It sits on a separate MySQL server reached through a hostname you created in the panel, often mysql.example.com. On cPanel, MySQL runs on the same machine, so DB_HOST becomes localhost.
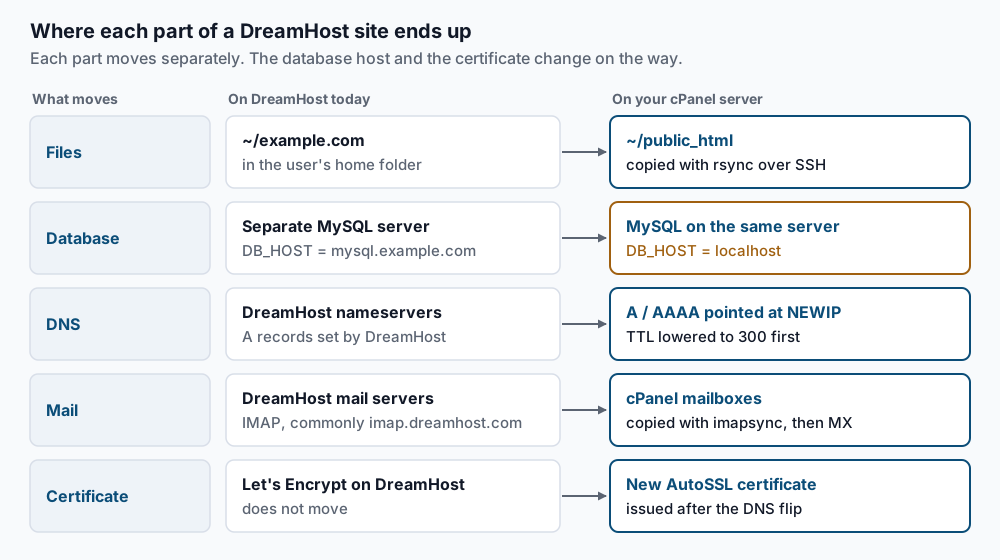
DNS and mail are separate lanes. If the domain uses DreamHost’s nameservers, DreamHost writes the A records for you while it hosts the site. Mail may also live on DreamHost’s mail servers, and it moves on its own schedule.
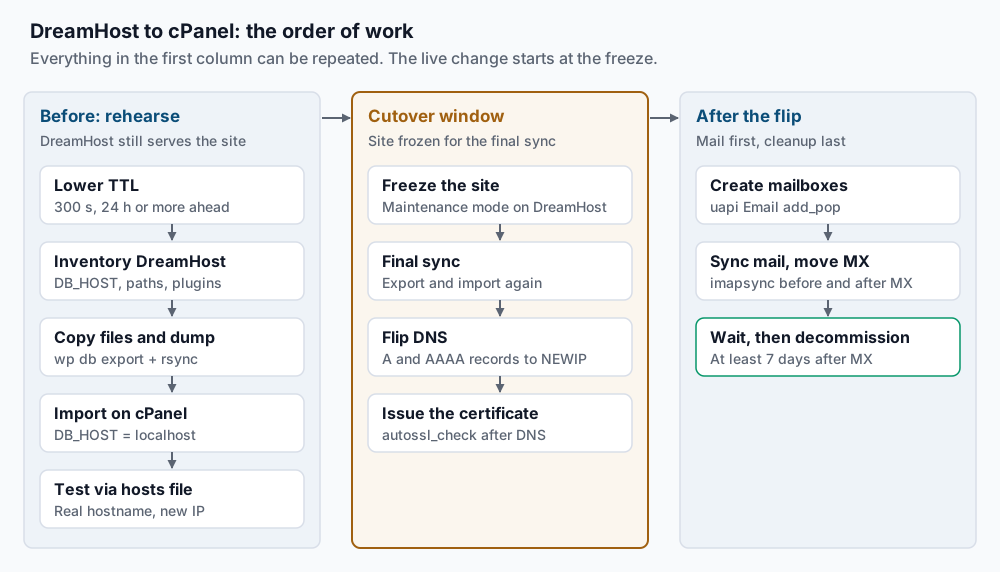
The move runs in phases. You copy and test while DreamHost still serves visitors, then freeze the site, copy the last changes, and flip DNS. Mail follows once the new mailboxes are ready.
Step-by-step
Steps 1 to 7 are a rehearsal you can repeat as often as you like. Step 8 is where the live change begins.
-
Take an inventory on DreamHost. Connect as the shell user and gather the facts you will need later:
ssh DHUSER@DHHOST
cd ~/example.com
wp --info
wp core version
wp config get DB_HOST
wp config get table_prefix
wp plugin list --status=active --fields=name,version
ls -1 wp-content/mu-plugins/
du -sh ~/example.com
pwd
wp --infoconfirms WP-CLI runs there.DB_HOSTshould print the MySQL hostname, such asmysql.example.com, which confirms the database is remote. Keep thepwdoutput,/home/DHUSER/example.com, because that path may be stored in the database. Iflsshows files you did not install, note them for step 5. On DreamPress, also note any caching plugin such as Proxy Cache Purge, which clears DreamHost’s server cache and has nothing to talk to on your server. -
Export the database. Still on DreamHost, in the site folder:
wp db export ~/dh-export.sql --add-drop-table
tail -c 300 ~/dh-export.sql
Expect
Success: Exported to '/home/DHUSER/dh-export.sql'.The tail should end with a complete statement and usually a-- Dump completedline. If the export fails with an access error, the MySQL user may be tied to specific hosts. Add the web server as an allowed host for that user in the panel’s MySQL section, then try again. -
Create the cPanel account and database. As root in WHM, create the account if it does not exist yet:
whmapi1 createacct username=CPUSER domain=example.comLook for
result: 1in the output. Then, asCPUSER, create the database and its user. cPanel adds theCPUSER_prefix to both names, so you type the full name:uapi Mysql create_database name=CPUSER_wp uapi Mysql create_user name=CPUSER_wp password='STRONG-PASSWORD' uapi Mysql set_privileges_on_database user=CPUSER_wp database=CPUSER_wp privileges='ALL PRIVILEGES'Each call should show
status: 1. Astatus: 0comes with anerrorsline, often a password that fails the server’s strength rule. Pick a longer one and run the call again. -
Copy the files and the dump. On the cPanel server, as
CPUSER, pull from DreamHost:rsync -az --info=progress2 DHUSER@DHHOST:example.com/ ~/public_html/ rsync -az DHUSER@DHHOST:dh-export.sql ~/The trailing slash on
example.com/copies the folder’s contents, not the folder itself. Check that sizes roughly matchdu -shfrom step 1:du -sh ~/public_htmlIf
rsyncreportsPermission denied (publickey,password), the DreamHost user is not a shell user yet, or the change has not finished applying. -
Import and fix
wp-config.php. Point WordPress at the local database, then import:cd ~/public_html wp config set DB_HOST localhost wp config set DB_NAME CPUSER_wp wp config set DB_USER CPUSER_wp wp config set DB_PASSWORD 'STRONG-PASSWORD' wp db import ~/dh-export.sqlEach
config setprints aSuccess: Updated the constantline, and the import ends withSuccess: Imported from. Remove host-specific leftovers that step 1 turned up. For a DreamPress cache plugin, for example:wp plugin deactivate varnish-http-purgeRun that only if the plugin showed in step 1. If you plan to use a cache on cPanel, set it up after the site is stable.
-
Rewrite stored paths, and URLs if they changed. Dry-run first:
wp search-replace '/home/DHUSER/example.com' '/home/CPUSER/public_html' --all-tables --dry-runThe table shows how many rows would change. If the count looks sane, run it again without
--dry-run. The domain usually stays the same, so no URL change is needed. If you built the site on a DreamHost temporary or staging hostname, replace that hostname withexample.comthe same way. Search-replace after a domain change explains why WP-CLI is safe for serialized data and hand-written SQL is not. -
Test through your hosts file. On your own computer, add this line to
/etc/hosts(on Windows,C:\Windows\System32\drivers\etc\hosts):NEWIP example.com www.example.comBrowse the site, log in, and check a form and an image upload. The browser warns about the certificate, since none is issued yet; accept it for this test only. Remove the line when you are done. If pages show
Error establishing a database connection, recheck the four values from step 5. -
Freeze, sync the last changes, and flip DNS. Put the DreamHost site into maintenance mode so nothing new is written. Re-run steps 2, 4 (the dump and a fresh file
rsync), 5 (the import) and 6. Then change the A record, and AAAA if you use IPv6, toNEWIP. If DreamHost hosts your DNS, it may not let you edit the records it manages while hosting is active. In that case, look in the panel for an option to set the domain to DNS only (menu names change), then add your own A record. Otherwise, edit the records wherever your nameservers point. -
Issue the certificate. HTTP validation only works once DNS points at the new server. Check that it does, then run AutoSSL for the account as root:
dig +short example.com @1.1.1.1
/usr/local/cpanel/bin/autossl_check --user=CPUSER
The first command must print
NEWIP. The second logs its checks and should end with a certificate installed forexample.comandwww.example.com. If it reports a DCV failure (domain control validation, the proof that you control the domain), wait a few minutes for DNS and run it again. -
Move the mail. Create each mailbox on cPanel first:
uapi Email add_pop email=info domain=example.com password='MAILBOX-PASSWORD' quota=0Expect
status: 1. Then copy each mailbox withimapsync, reading passwords from files so they stay out of your shell history. Use the IMAP server name DreamHost lists for mail clients, commonlyimap.dreamhost.com:imapsync --host1 imap.dreamhost.com --ssl1 --user1 info@example.com --passfile1 dh.pass \ --host2 NEWIP --ssl2 --user2 info@example.com --passfile2 cp.pass --dryWhen the dry run looks right, run it without
--dry. Change the MX record to your cPanel server only after every mailbox has synced once. Runimapsyncagain after the MX change to catch late messages. Migrating mailboxes into cPanel with imapsync covers folder mapping and large mailboxes. -
Decommission after a waiting period. Keep DreamHost running for at least 7 days after the MX change. Download a final copy of the files and the dump for your records. Then remove the hosting in the DreamHost panel. If the domain is registered at DreamHost or uses its nameservers, cancel only the hosting, not the registration or DNS.
Validate it works
From the cPanel server, as CPUSER:
cd ~/public_html
wp config get DB_HOST
wp option get siteurl
wp db check
wp core verify-checksums
DB_HOST must print localhost and siteurl your real address. wp db check should report OK for each table, and checksums should verify. From outside, confirm DNS, TLS and mail routing:
dig +short example.com @8.8.8.8
dig +short MX example.com @8.8.8.8
curl -sI https://example.com/ | head -1
The first should print NEWIP, the second your new mail host, and the third a 200 status line with no certificate error. Send a message to each mailbox and reply from it. Trigger a password reset to prove the site can send mail too.
Troubleshooting
“Error establishing a database connection” after the import. DB_HOST still says mysql.example.com, or the name lacks the CPUSER_ prefix. Run wp config get DB_HOST and wp config get DB_NAME, then fix them with wp config set.
Links and images still point at a DreamHost address. The site was built on a temporary hostname. Run wp search-replace from that hostname to example.com with --all-tables, then wp cache flush.
Uploads fail with a permission error. Files were copied as root. Fix ownership as root with chown -R CPUSER:CPUSER /home/CPUSER/public_html.
AutoSSL skips the domain. DNS still points at DreamHost, or a CAA record (a DNS record that lists which certificate authorities may issue for the domain) blocks the issuer. Check both with dig, fix, and run autossl_check again.
Mail stops after the MX change. The mailbox was not created before MX moved, or cPanel treats the domain as remote mail. In cPanel’s Email Routing, set the domain to Local Mail Exchanger once MX points at the server, and create any missing mailbox.
When this is the wrong approach
If you want DreamPress features such as one-click staging and a managed cache, an unmanaged cPanel account will not give you those out of the box. You would need to build them yourself. The Bluehost migration guide shows the same trade-off from another host.
If mail is the most sensitive part of the business, split the move. Migrate the website first, leave MX at DreamHost, and move mail in a separate window.
If the site holds tens of gigabytes of uploads, the final sync in step 8 can take hours. Run the file rsync a few times in the days before, so the last pass only copies what changed, and plan a longer freeze.
Running WordPress that earns real money deserves an operator — Stack Harbor runs that stack under Enterprise WordPress; book an infrastructure consult.