This guide shows you how to move a site from WordPress.com, the hosted service run by Automattic, to self-hosted WordPress on a cPanel account. It is for site owners and admins who have outgrown the platform and want their own plugins, their own server and their own backups. The catch is that what you can take with you depends on your WordPress.com plan. Plans that allow plugins and SFTP (secure file transfer) let you copy the whole site, while every other plan gives you a content export only. By the end you will have the site running on cPanel, the domain and email pointed correctly, and a checked list of what did not travel.
What you’ll accomplish
- A clear decision on which of the two migration paths your plan allows.
- A fresh WordPress install on cPanel, built with WP-CLI (the official WordPress command line).
- Your posts, pages, comments, menus and media imported, with old image addresses rewritten to your domain.
- The same permalink structure as before, so existing links and search results keep working.
- The domain, email records and a TLS certificate in place before and after the DNS change.
Prerequisites
On WordPress.com, you need administrator access to the site. On the destination, you need a cPanel account with SSH (secure shell) enabled and wp available on the command line. Most cPanel hosts install WP-CLI for you. Run wp --info over SSH, and if it prints a PHP version and a WP-CLI version, you are ready.
Before you start, write down four things while the old site is still live.
- Your plan and what it allows. In the WordPress.com dashboard, check whether you can install plugins and whether SFTP (secure file transfer) credentials are shown in the hosting settings. That answer picks your path.
- One real post URL. Copy the address of any published post, for example
https://example.com/2024/03/15/spring-menu/. You will match its shape in step 7. - Where the domain is registered. Check the Domains screen. If it lists your domain as registered through WordPress.com, the domain is a separate task covered in step 10.
- Where email lives. Run
dig +short MX example.comfrom any terminal. The answer tells you which mail provider you must keep pointing at.
Also take screenshots of your theme customizer, widget areas and site settings. The export file does not carry them, and you will rebuild them by hand.
How it works
WordPress.com and self-hosted WordPress run the same core software. The difference is who controls the server around it. That is why a migration here is really a choice between two paths.
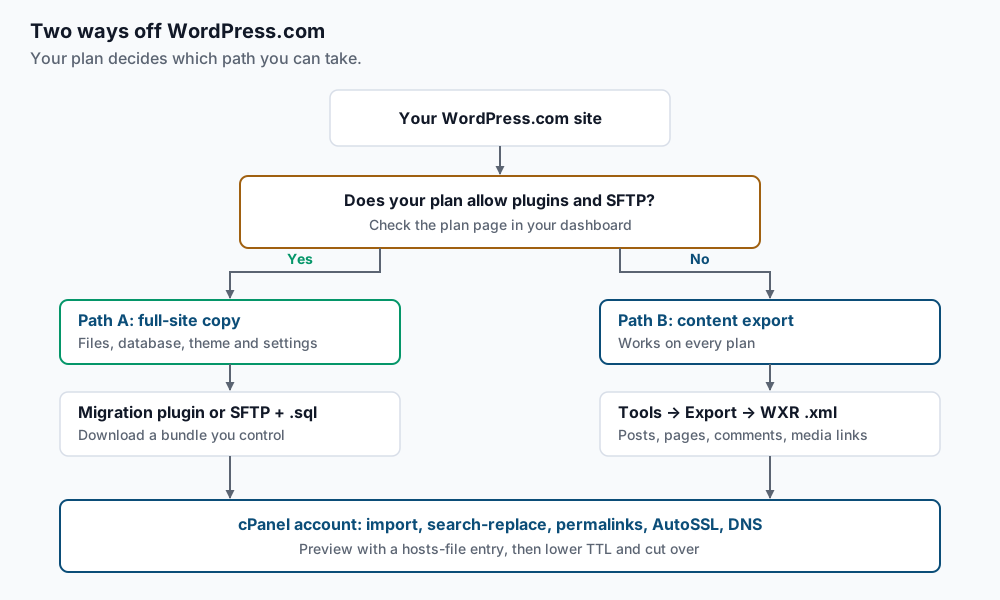
Path A, the full-site copy. If your plan lets you install plugins and use SFTP, you can move the site the same way you would from any host. You either install a migration or backup plugin and download its bundle, or you copy wp-content over SFTP and export the database. Themes, plugin settings and widgets come along, because the whole database comes along. From there, the generic host migration runbook covers the rest in detail.
Path B, the content export. Every plan has Tools → Export in the dashboard. It produces a WXR file, which stands for WordPress eXtended RSS. WXR is an XML file that lists your posts, pages, comments, categories, tags, menus and authors, plus a reference to each media file. On the new site, the WordPress Importer plugin reads that file and can download each attachment from WordPress.com as it goes.
The map below shows what arrives through Path B and what you need to handle yourself.
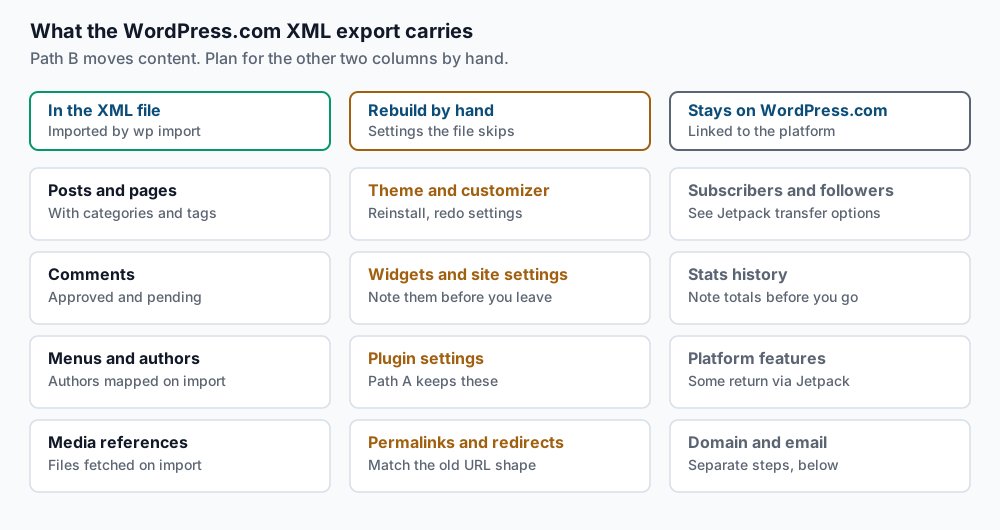
The last column deserves a note. Subscribers, stats and some platform features belong to the WordPress.com account, not to the site. Jetpack, Automattic’s plugin that connects a self-hosted site to WordPress.com services, can bring some of that back if you want it. WordPress.com’s support pages describe moving subscribers to a site running Jetpack, so check their current guidance before you close anything.
If you are still deciding whether to leave at all, the comparison of WordPress.com and WordPress.org lays out the trade-offs.
Step-by-step
The steps below follow Path B, because it works on every plan. If you took Path A, do step 1, then import your bundle as the generic runbook describes and rejoin at step 6.
-
Create the database on cPanel. Use cPanel’s MySQL Databases screen, or run the same thing over SSH. cPanel adds your account name as a prefix, so
wpbecomescpuser_wp:uapi Mysql create_database name=cpuser_wp uapi Mysql create_user name=cpuser_wp password='a-long-random-password' uapi Mysql set_privileges_on_database user=cpuser_wp database=cpuser_wp privileges=ALL%20PRIVILEGESEach call should end with
status: 1. Astatus: 0comes with anerrors:line, and the most common one means the name is missing your account prefix. -
Download and configure WordPress. Work inside the document root for the domain, usually
~/public_html:cd ~/public_html wp core download wp config create --dbname=cpuser_wp --dbuser=cpuser_wp --prompt=dbpassExpect
Success: WordPress downloaded.and thenSuccess: Generated 'wp-config.php' file.The--prompt=dbpassflag asks for the password so it never lands in your shell history. -
Install WordPress on the final domain. Use the real domain now, not a temporary one, so there is nothing to replace later:
wp core install --url=https://example.com --title='Example' --admin_user=siteadmin --admin_email=you@example.com --prompt=admin_passwordExpect
Success: WordPress installed successfully.Choose an admin username that differs from your WordPress.com username, so the importer can map authors cleanly. -
Export from WordPress.com. In the WordPress.com dashboard, open Tools → Export and export all content. You receive a
.zipby download or by email. Unzip it and upload the.xmlfile or files to your cPanel home directory:scp example.wordpress.com-2026-09-21.xml cpuser@cpanel.example.com:~/Large sites can produce several XML files. Keep them all and import each one in turn. The WordPress.com export guide describes the current screen and any separate media download it offers.
-
Import the content with WP-CLI. Install the importer, then run it from the site directory:
wp plugin install wordpress-importer --activate
wp import ~/example.wordpress.com-2026-09-21.xml --authors=create
The first command ends with
Success: Installed 1 of 1 plugins.The import prints a line for each item it creates and ends withSuccess: Finished importing fromplus the file name.--authors=createmakes a local user for each author in the file. The wp import reference lists the other author options. Running the import over SSH also avoids the upload size limit that often stops the browser importer on large files.By default, the importer downloads every attachment from WordPress.com. Lines saying
Failed to import Mediamean a file could not be fetched. Note their names, because step 6 finds anything still pointing at the old host. -
Find and rewrite old media addresses. Images that the importer fetched are usually rewritten to your domain. Resized copies, gallery links and images served through WordPress.com’s image service often are not. Look first, change nothing yet:
wp search-replace 'example.files.wordpress.com' 'example.com/wp-content/uploads' --dry-run --report-changed-only
wp search-replace 'i0.wp.com/example.com' 'example.com' --dry-run --report-changed-only
Each dry run prints a table of counts and a closing
Success: N replacements to be made.line. Zero on both means you are done. Before committing, confirm that the file exists locally. A post that pointed atexample.files.wordpress.com/2024/03/menu.jpgneedswp-content/uploads/2024/03/menu.jpgon disk. Check withls ~/public_html/wp-content/uploads/2024/03/. When the files are there, run the same commands without--dry-run. The images can also appear underi1.wp.comori2.wp.com, so repeat the dry run for those. For how serialised data behaves during a rewrite, see search-replace after a domain change. -
Match the old permalink structure. Look at the post URL you saved in the prerequisites and pick the matching rule:
wp rewrite structure '/%postname%/'
wp rewrite flush
Use
'/%postname%/'when your old URL looked like/spring-menu/. Use'/%year%/%monthnum%/%day%/%postname%/'when it looked like/2024/03/15/spring-menu/. ExpectSuccess: Rewrite structure set.and thenSuccess: Rewrite rules flushed.If you choose a new shape on purpose, every old URL needs a 301 redirect, meaning a permanent redirect that search engines follow. -
Rebuild what the export skipped. Install your theme, or its closest self-hosted equivalent, then redo the customizer, widgets, site title, tagline and reading settings from your screenshots. Install the plugins that replace any WordPress.com features you relied on, such as contact forms, a sitemap or a backup tool. If you want to keep WordPress.com stats or subscriber features, install Jetpack now and connect it.
-
Preview the site before DNS moves. Point only your own computer at the new server with a hosts-file entry. On macOS or Linux, add one line to
/etc/hosts, using your cPanel server’s IP address:203.0.113.10 example.com www.example.comOpen the site in a private browser window and click through posts, pages, images and menus. The browser shows a certificate warning until AutoSSL runs in step 11, which is expected here. Remove the line when you finish.
-
Plan the domain and email. First lower the TTL (time to live, how long resolvers cache a DNS answer) on the A records to 300 seconds. Do it at least 24 hours before the move, if your DNS provider allows it. Then choose one route for a domain registered through WordPress.com.
- Keep the registration there. Change the A records to your cPanel IP, or change the nameservers to your new DNS host. Before changing nameservers, copy every MX and TXT record, because your email and its SPF (sender policy) record must be recreated at the new DNS host.
- Transfer the registration. Unlock the domain and request the authorization code from the Domains screen, then start the transfer at your new registrar. ICANN, the body that sets domain rules, generally blocks transfers for 60 days after a registration or a previous transfer, so check the dates first.
If your email is hosted outside cPanel, set the domain to Remote Mail Exchanger under cPanel’s Email Routing. Otherwise cPanel treats itself as the mail server and keeps messages meant for your real provider.
-
Cut over and issue the certificate. Change the A record, or the nameservers, to point at cPanel. Once the domain resolves to the new server, run AutoSSL, cPanel’s free certificate service, from SSL/TLS Status, or wait for its next automatic run. Then confirm coverage:
uapi SSL installed_hosts | grep -E 'example\.com'Both
example.comandwww.example.commust appear. If one is missing, AutoSSL could not validate it, which usually means DNS has not reached the new server yet.
Validate it works
Run these checks once public DNS points at cPanel:
dig +short example.com @1.1.1.1
wp option get home
wp post list --post_type=post --format=count
wp search-replace 'files.wordpress.com' 'example.com' --dry-run --report-changed-only
The first line must print your cPanel IP address. home must print https://example.com. The post count should match the published count on WordPress.com. The last dry run should report 0 replacements to be made, which means no content still loads from the old host.
Then check a handful of old URLs from outside, including your five busiest posts:
curl -s -o /dev/null -w '%{http_code}\n' https://example.com/2024/03/15/spring-menu/Each should print 200. A 404 means the permalink structure from step 7 does not match. Finish by sending a message to your own domain and submitting your contact form, so you know mail flows both ways.
Troubleshooting
The import stops with an error about the importer. The WordPress Importer plugin is not active on that site. Run wp plugin list --status=active and check that wordpress-importer appears, then retry.
Images show as broken after import. The importer could not download some attachments, often because of a timeout. Run the same wp import command again on the same file. The importer skips items that already exist and retries only what is missing. Then repeat the dry runs from step 6.
All posts belong to the admin user. The import ran with a different author option, or the authors were mapped by hand. Reassign them with wp post update, or delete the imported content and re-import with --authors=create.
Old links return 404. The permalink structure does not match your old URLs. Repeat step 7 with the right pattern, then flush again. If only some links fail, those posts may have used a custom slug, so compare the slug with wp post list --fields=ID,post_name.
Email stopped arriving after the cutover. The MX records were not recreated at the new DNS host, or cPanel is set to Local Mail Exchanger. Compare dig +short MX example.com with the records you copied in step 10.
When this is the wrong approach
If your site depends on WordPress.com features you do not want to replace, such as its managed updates, built-in security and platform support, self-hosting adds work. You now own updates, backups, caching and security, and those tasks do not go away after launch.
If your plan allows plugins, prefer Path A. A full-site copy keeps theme settings, widgets and plugin data that the XML export drops, so you rebuild less.
If you have a large store or a membership site, test the move on a staging copy first. The XML export is designed for content, and orders, customer accounts and subscriptions need a full database copy to survive.
Running WordPress that earns real money deserves an operator — Stack Harbor runs that stack under Enterprise WordPress; book an infrastructure consult.