Every environment has a default address. You can also serve it under your own domain, such as www.example.com, and protect that domain with an SSL certificate so visitors use HTTPS.
Open Domains & SSL
- Open the environment, then select Tools.
- Select Domains & Certificates. The Domains & SSL section opens.
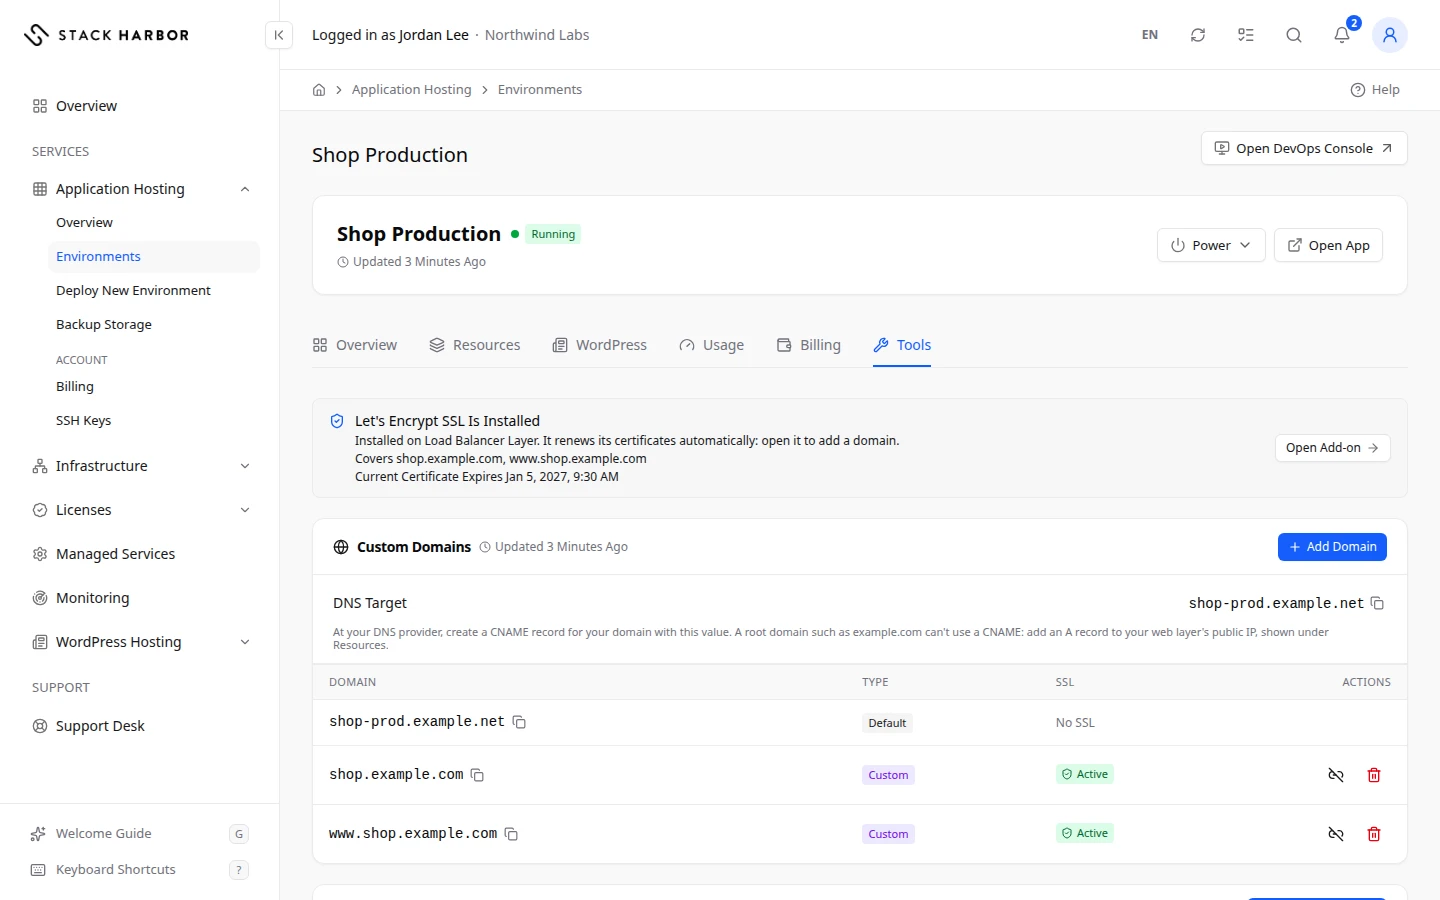
Add your domain
- Note the DNS Target. It’s the address your domain must point at.
- In Custom Domains, select Add Domain.
- Type the Domain, for example www.example.com.
- Under Certificate (Optional), choose a certificate you already uploaded, or Add Without a Certificate for Now.
- Select Add Domain. You see Domain added.
- At your DNS provider, create a CNAME record for the domain with the DNS Target as its value. A root domain such as example.com can’t use a CNAME. Add an A record that points to your web layer’s public IP instead, shown under Resources.
Adding the domain in Lighthouse doesn’t change your DNS. The domain works once your DNS record is in place.
The Custom Domains table lists each domain with its Type (Default for the built-in address, Custom for yours) and its SSL state.
Get a free certificate
The Let’s Encrypt SSL add-on gives free certificates that renew by themselves. Your domain must already point at the public IP of the layer it’s installed on.
- In the Free SSL With Let’s Encrypt card, select Get a Free Certificate.
- Install the add-on on your web layer, and enter your domain in its form. See Install an add-on.
Once installed, the card reads Let’s Encrypt SSL Is Installed. It shows the domains it covers and when the current certificate expires. Select Open Add-on to add a domain.
Upload your own certificate
- In SSL Certificates, select Upload Certificate.
- Paste the Certificate (PEM) and the Private Key (PEM). Add the Intermediate / CA Bundle (Optional, PEM) if your provider gave you one.
- Select Upload Certificate. You see Certificate uploaded.
- In Custom Domains, select the bind button on your domain’s row.
- Choose the Certificate, then under Apply To pick This Domain Only or All Domains on This Environment.
- Select Bind Certificate.
The SSL Certificates table lists each certificate with Issued By, Type, the domains it Covers and when it Expires. Expiring Soon and Expired warn you to renew it.
Remove a domain or a certificate
- To stop serving a domain, select its remove button and confirm Remove.
- To take SSL off a domain, select Remove SSL. Visitors using https:// see a connection error until you bind a certificate again.
- To delete a certificate, select its remove button. Any domain still using it loses SSL at once.
If something goes wrong
- This domain is already bound elsewhere. Choose a different one.
- This environment has no web-facing layer, so it can’t take a custom domain. Add an Application Node or Load Balancer layer first.
- That certificate could not be uploaded — check the key and certificate are valid PEM text. Paste the full text, including the BEGIN and END lines.
- Only the workspace owner can manage domains and certificates.
Fields and statuses
What each item on this page means, what it does and how to read it.
- DNS Target Field
-
What it is. The address your domain must point at.
What it does. Use it as the value of a CNAME record at your DNS provider.
How to read it. A root domain such as example.com cannot use a CNAME. Point an A record at your web layer’s public IP instead.
- Domain Column
-
What it is. A domain the environment answers to.
- Type Column
-
What it is. Whether the domain is built in or your own.
How to read it. Default is the built-in address. Custom is a domain you added.
- SSL Column
-
What it is. Whether the domain is served over HTTPS.
How to read it. Active means a certificate is bound. No SSL means visitors use plain HTTP.
- Issued By Column
-
What it is. Who issued the certificate.
- Type Column
-
What it is. Where the certificate comes from.
How to read it. Let’s Encrypt for a free certificate from the add-on. Custom for one you uploaded.
- Covers Column
-
What it is. The domains the certificate is valid for.
- Expires Column
-
What it is. When the certificate stops being valid.
How to read it. Expiring Soon means renew it. Expired means browsers now warn visitors.
- Expiring Soon Status
-
What it is. The certificate expires soon.
How to read it. Upload a renewed certificate and bind it. Let’s Encrypt certificates renew by themselves.
- Expired Status
-
What it is. The certificate is no longer valid.
What it does. Browsers warn visitors who open the site over HTTPS.
How to read it. Upload a new certificate and bind it to the domain.
- Certificate (PEM) Field
-
What it is. Your certificate, pasted as PEM text.
How to read it. Paste the full text, including the BEGIN and END lines.
- Private Key (PEM) Field
-
What it is. The private key that goes with the certificate, as PEM text.
- Intermediate / CA Bundle (Optional, PEM) Field
-
What it is. The intermediate certificates from your certificate provider.
What it does. Helps every browser trust the certificate.
How to read it. Optional.
- Apply To Field
-
What it is. Which domains the certificate is bound to.
What it does. This Domain Only binds it to one domain. All Domains on This Environment binds it to every domain of the environment.