Use Deploy Cloud Server to create a new cloud server. A cloud server is a virtual machine that runs in our data centre. You pick what it starts from, how big it is and how you sign in. Nothing is created until the last step, and one server is created per deploy.
Before you start
- Only the account owner can deploy a server.
- Infrastructure must be enabled. See Enable a service.
- Have an SSH key ready, or create one during the deploy. An SSH key is a pair of files: a public key that goes on the server and a private key that stays with you. See Add an SSH key.
Deploy a server
- Open Infrastructure, then Cloud Servers, and select Deploy Cloud Server.
- Work through the steps. A progress bar shows where you are, and the Your Server summary on the side shows your choices so far. Select Continue to go to the next step, or Back to change an earlier one.
- On Review, check everything and select Deploy Cloud Server.
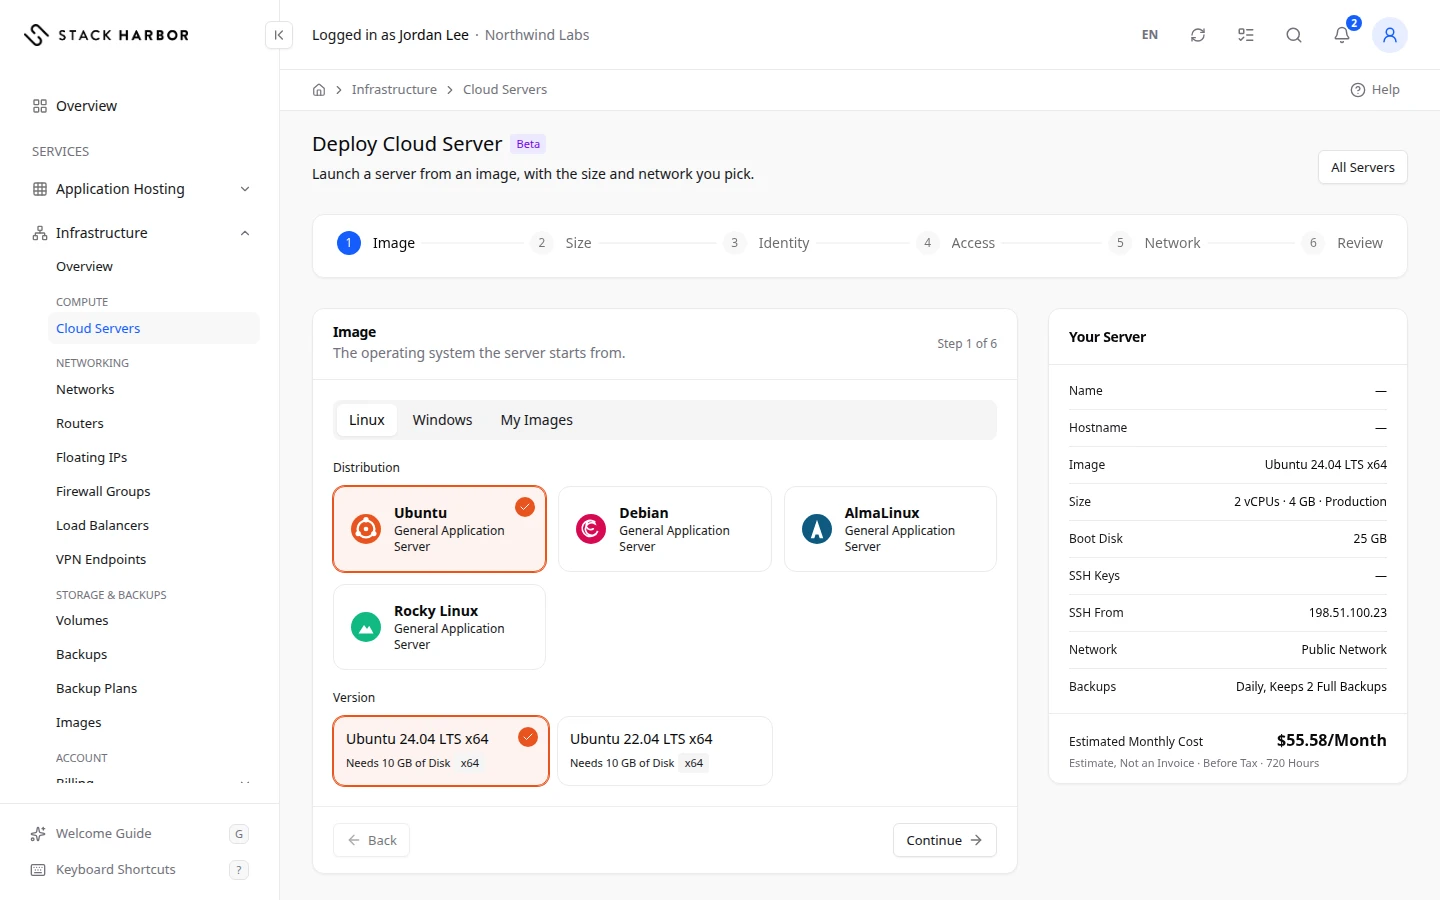
Image
The image is the operating system the server starts from.
- Choose a tab: Linux, Windows, BSD, Appliances or My Images. My Images holds the images you saved from your own servers. See Manage images.
- Select an image tile. A tile can say Needs 20 GB of Disk (or another size) when the image needs a minimum disk.
- A Windows image shows its monthly licence price, or Windows License Included when the licence costs nothing extra.
From a backup
To start a server as a copy of another server’s boot disk, open a backup of that disk and select Deploy New Server From Backup. The form’s first step is then Backup, not Image, and sizes too small for the backup are greyed out. See Manage a backup.
Applications
When applications are offered for your account, the Image step has two choices at the top: Operating Systems and Applications.
- Select Applications, then an application card, for example cPanel & WHM. About This Application shows its Version, what it Installs On, its Minimum Size and Recommended Size, the Licenses it needs and its Installation Time.
- An extra Application step appears after Image. It shows the licenses the application needs, each Included and Required or Optional, with its monthly price. Tick I Have IP-Based Licenses if you bring your own licenses. Then choose the server’s Hostname: Automatic lets the control panel name the server, or Use My Own Hostname.
- On Size, sizes too small for the application are marked, for example Disk Too Small for cPanel & WHM.
On Review, you see that the application is installed when the server first starts. The installation runs on its own once the server is built. Our team confirms your licenses before it starts. The server’s page then shows the installation’s steps and state, such as Waiting for Licenses, Installing or Ready.
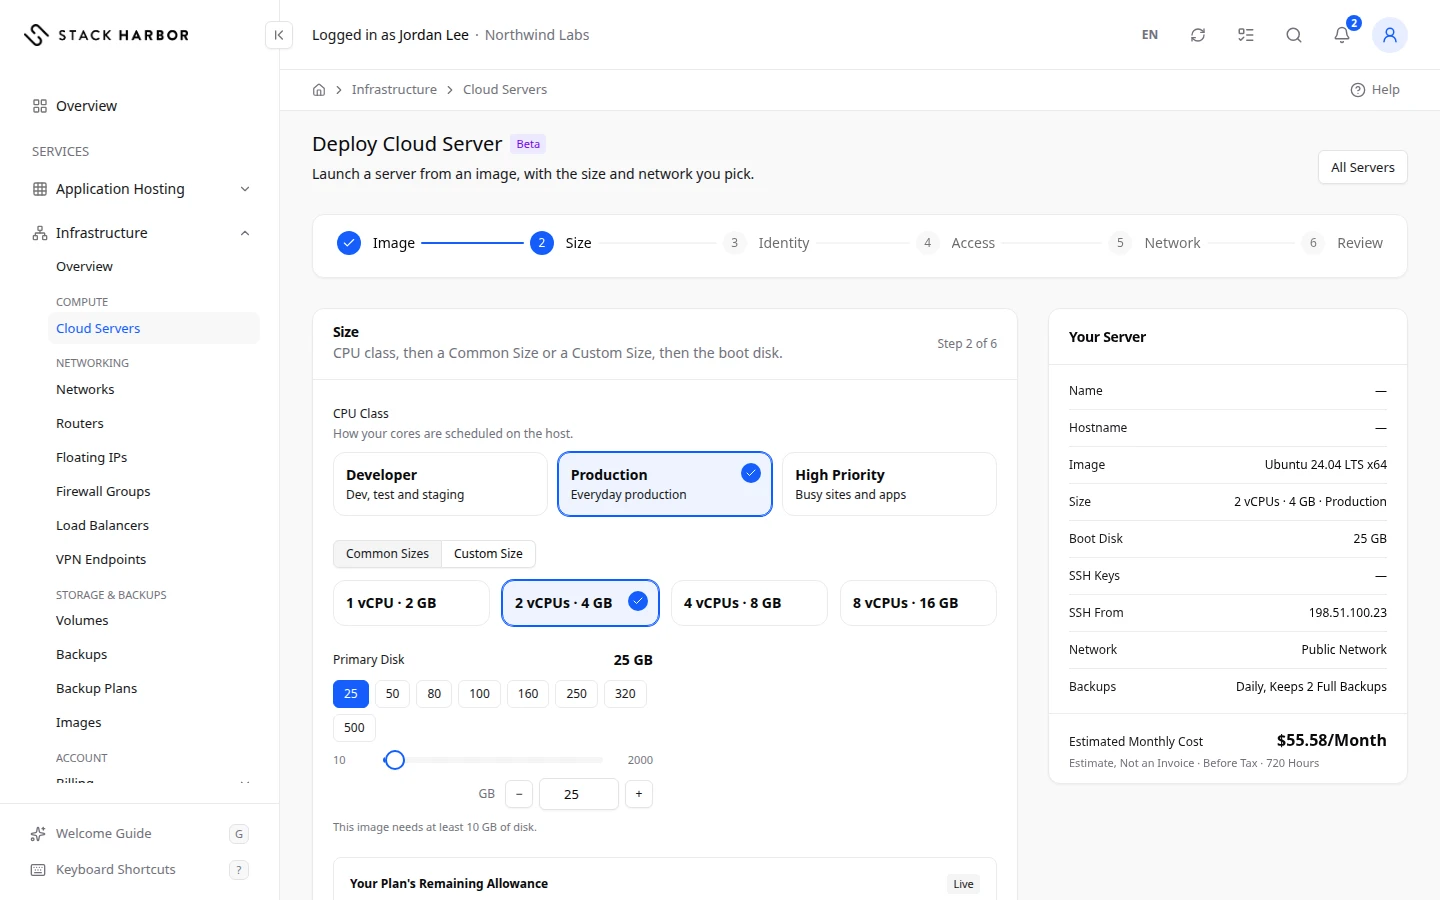
Size
- Pick a CPU Class. It sets how your cores are scheduled on the host:
- Developer, for dev, test and staging.
- Production, for everyday production.
- High Priority, for busy sites and apps. A class marked Coming Soon can’t be chosen yet.
- Choose Common Sizes to pick a ready-made size, or Custom Size to set CPU Cores, Memory and Primary Disk yourself. The Primary Disk is the boot disk: the server starts from it.
- Under Backups, choose how the server is backed up. Default is preselected. Each other card says how often it runs, in UTC time, and how many restore points it keeps. A restore point is one backup you can go back to. Choose No Automatic Backups to skip them. You can change this later on the server’s Backups tab.
The Your Plan’s Remaining Allowance box shows how many CPU Cores, how much Memory and how much Disk your account limits have left. If a size goes over them, you see This Size Can’t Be Deployed with the reason.
Identity
- Under Hostname, keep the hostname Stack Harbor assigns. It is reserved for this server and Stack Harbor manages its DNS. To use a name on your own domain, turn on Use My Own Hostname and type it, for example web-01.example.com. Stack Harbor does not create DNS records for your own name. Point it at the server’s address at your DNS provider.
- In Server Name, type the name shown in your server lists, up to 64 characters, without
<or>. Until you type one, it follows the hostname. - Optional: turn on Set an Initial Root Password and type a password, or select Generate. It works in the browser console only, because SSH stays key-only. You must change it the first time you sign in. It needs 12 to 128 characters. Copy it now, because it is not shown again. Some images sign in with SSH keys only, and this option does not appear.
Access
- Under Your SSH Keys, tick the keys this server gets when it’s built. Only the keys you tick are installed. You can also select Generate Key or Import Key here.
- Optional: under Paste a Public Key, paste one public key. It is installed on this server only and isn’t saved to your SSH keys.
- Optional: select Generate One-Time Key. Lighthouse makes a key pair in your browser for this server only. Save the private key, then select I’ve Saved the Key to continue.
- Under SSH From (Port 22) (or RDP From (Port 3389) for Windows), select Use My Address or type one IP address, for example 203.0.113.7. New servers block all inbound traffic, and this opens SSH or RDP to that one address only. You can open more later in Firewall Groups.
You need at least one SSH key in total. Without one, nobody can sign in to the server.
Network
- Turn on Public Network to give the server a public IPv4 address. Its monthly price shows beside it, or Public IPv4 Included when it costs nothing extra.
- Turn on Private Network and choose one of your networks, for traffic between your servers. See Create a network.
- You can choose both. Then the public network carries the server’s primary address. Only networks with an IPv4 subnet are listed.
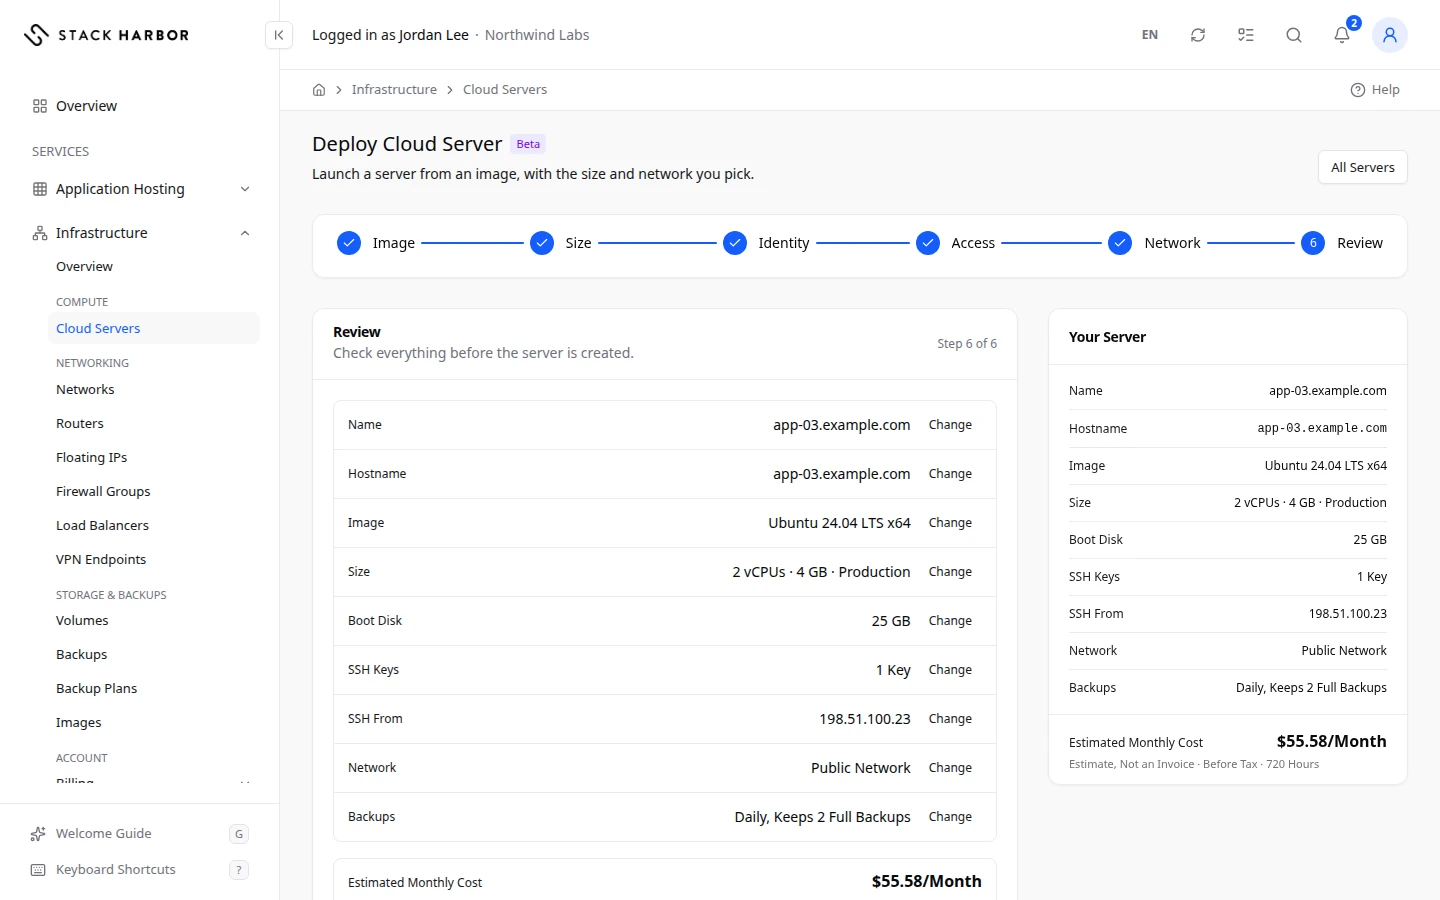
Review
The Review step lists every choice, with a Change link beside each one. Estimated Monthly Cost shows the monthly estimate for your choices. It is an estimate, not an invoice, before tax, for 720 hours. Automatic backups are not included in it. If it shows Not Available, you can still deploy and your invoice shows the actual charges.
What you see afterwards
You see Deploying web-01… and Lighthouse opens the server’s page. The status shows Building while the server is created, which takes about a minute. Then it changes to Running and you see Your server is ready. Next, connect to the server.
If the backup plan couldn’t be put in place, the server page shows Automatic Backups Aren’t Set Up. Select Open Backups to set one. See Back up and restore servers and volumes.
If something goes wrong
- The Server Wasn’t Created shows the reason and a button that takes you to the step to fix. Fix that step and try again. Nothing was created.
- Your Account Isn’t Ready Yet means a step such as a payment card is missing. See Enable a service.
- Your Project Is Still Being Set Up means Infrastructure setup hasn’t finished. Wait a few minutes.
- A server with this name already exists in this project. Choose another name. Go back to Identity and change Server Name.
- Access can’t be opened to the whole internet when deploying. Enter your own address; you can widen it later in Firewall Groups.
- Deploying Isn’t Available Yet means server creation is still being switched on for your account. Open a support ticket if it stays.
- If the server status turns to Error, open the server page. See Manage a server.
Fields and statuses
What each item on this page means, what it does and how to read it.
- Linux Option
-
What it is. The tab of Linux images.
What it does. Shows Linux distributions you can start a server from.
- Windows Option
-
What it is. The tab of Windows Server images.
What it does. Shows Windows images. Each tile shows its monthly licence price, or that the licence is included.
- BSD Option
-
What it is. The tab of BSD images, such as FreeBSD.
- Appliances Option
-
What it is. The tab of appliance images: ready-made systems built for one job.
- My Images Option
-
What it is. The tab of images you saved from your own servers or backups.
What it does. Lets you start a new server from a copy of one of yours.
- Windows License Included Status
-
What it is. The Windows licence for this image costs nothing extra.
How to read it. No licence line is added to the server’s cost.
- CPU Class Field
-
What it is. How the server’s cores are scheduled on the host.
What it does. A higher class gets the CPU more readily when the host is busy, at a higher price.
- Developer Option
-
What it is. The CPU class for development, testing and staging.
What it does. The lowest-priced class. Cores can wait their turn when the host is busy.
- Production Option
-
What it is. The CPU class for everyday production work.
- High Priority Option
-
What it is. The CPU class for busy sites and apps.
What it does. Cores are served first when the host is busy.
- Coming Soon Status
-
What it is. This CPU class isn’t offered yet.
How to read it. Choose another class for now.
- Common Sizes Option
-
What it is. Ready-made combinations of cores, memory and disk.
What it does. Picks a whole size in one click.
- Custom Size Option
-
What it is. A size you set yourself.
What it does. Lets you set CPU Cores, Memory and Primary Disk one by one.
- CPU Cores Field
-
What it is. The number of virtual CPU cores the server gets.
What it does. More cores let the server do more work at the same time. Cores are billed per core per hour.
- Memory Field
-
What it is. The amount of RAM the server gets, in GB.
What it does. Memory is billed per GB per hour.
- Primary Disk Field
-
What it is. The boot disk the server starts from, in GB.
What it does. It holds the operating system. It is billed per GB per hour while it exists, even when the server is stopped.
- Backups Field
-
What it is. How the new server is backed up automatically.
What it does. Each card says how often backups run, in UTC time, and how many restore points it keeps.
How to read it. Default is preselected. You can change it later on the server’s Backups tab.
- Default Option
-
What it is. The standard backup plan for new servers.
How to read it. It is preselected. Its card shows how often it runs and how many restore points it keeps.
- No Automatic Backups Option
-
What it is. The server is created without a backup plan.
What it does. No backups are taken until you set a plan.
- Your Plan's Remaining Allowance Metric
-
What it is. How many cores, how much memory and how much disk your account limits have left.
How to read it. Each line shows what is left. If a size goes over it, the size can’t be deployed.
- This Size Can't Be Deployed Status
-
What it is. The chosen size goes over your account limits, or isn’t available.
How to read it. The message gives the reason. Pick a smaller size, or ask support to raise a limit.
- Hostname Field
-
What it is. The server’s full network name.
What it does. By default Stack Harbor assigns one, reserves it for this server and manages its DNS.
- Use My Own Hostname Option
-
What it is. Use a name on your own domain, for example web-01.example.com.
What it does. Stack Harbor doesn’t create DNS records for it. Point the name at the server’s address at your DNS provider.
- Server Name Field
-
What it is. The name shown in your server lists.
What it does. It follows the hostname until you type one. You can rename the server later.
How to read it. 1 to 64 characters, without < or >.
- Set an Initial Root Password Option
-
What it is. A password for the administrator account, for the browser console only.
What it does. SSH stays key-only. You must change the password the first time you sign in.
How to read it. 12 to 128 characters. It isn’t shown again, so copy it now.
- Your SSH Keys Field
-
What it is. The SSH keys saved on your account.
What it does. Only the keys you tick are installed on the new server.
How to read it. You need at least one key in total to sign in over SSH.
- Paste a Public Key Field
-
What it is. One public key to install on this server only.
What it does. It isn’t saved to your SSH keys.
- SSH From (Port 22) Field
-
What it is. The one IP address allowed to reach the server over SSH.
What it does. New servers block all inbound traffic. This opens port 22 to that address only.
How to read it. Use My Address fills in the address you are on now. You can open more later in Firewall Groups.
- RDP From (Port 3389) Field
-
What it is. For Windows: the one IP address allowed to reach the server over Remote Desktop.
What it does. It opens port 3389 to that address only.
How to read it. You can open more later in Firewall Groups.
- Public Network Option
-
What it is. Gives the server a public IPv4 address on the internet.
What it does. Its monthly price shows beside it, or that it is included.
How to read it. With both networks on, the public network carries the primary address.
- Public IPv4 Included Status
-
What it is. The public IPv4 address costs nothing extra on your plan.
- Private Network Option
-
What it is. Connects the server to one of your private networks, for traffic between your servers.
How to read it. Only networks with an IPv4 subnet are listed.
- Estimated Monthly Cost Metric
-
What it is. An estimate of what the server will cost per month with your choices.
How to read it. In your account currency, before tax, for 720 hours. Automatic backups aren’t included. Usage is billed after the month ends. It is an estimate, not an invoice.
- Automatic Backups Aren't Set Up Status
-
What it is. The server was created, but its backup plan couldn’t be put in place.
How to read it. Select Open Backups and set a plan.
- The Server Wasn't Created Status
-
What it is. The deploy stopped and nothing was created.
How to read it. The message gives the reason and a button to the step to fix. Fix it and try again.
- Your Account Isn't Ready Yet Status
-
What it is. A setup step, such as a payment card, is still missing.
How to read it. Finish the steps in Enable a service, then deploy again.
- Your Project Is Still Being Set Up Status
-
What it is. Infrastructure setup for your account hasn’t finished yet.
How to read it. Wait a few minutes, then deploy.
- Deploying Isn't Available Yet Status
-
What it is. Server creation is still being switched on for your account.
How to read it. Open a support ticket if it stays.