An environment is made of layers, and each layer runs one or more nodes. The Resources tab shows them and lets you change their size and number. It also opens each node’s files. You pay for what the layers reserve and use, so resizing changes your bill.
See your layers and nodes
- Open the environment, then select Resources.
- Pick a view at the top.
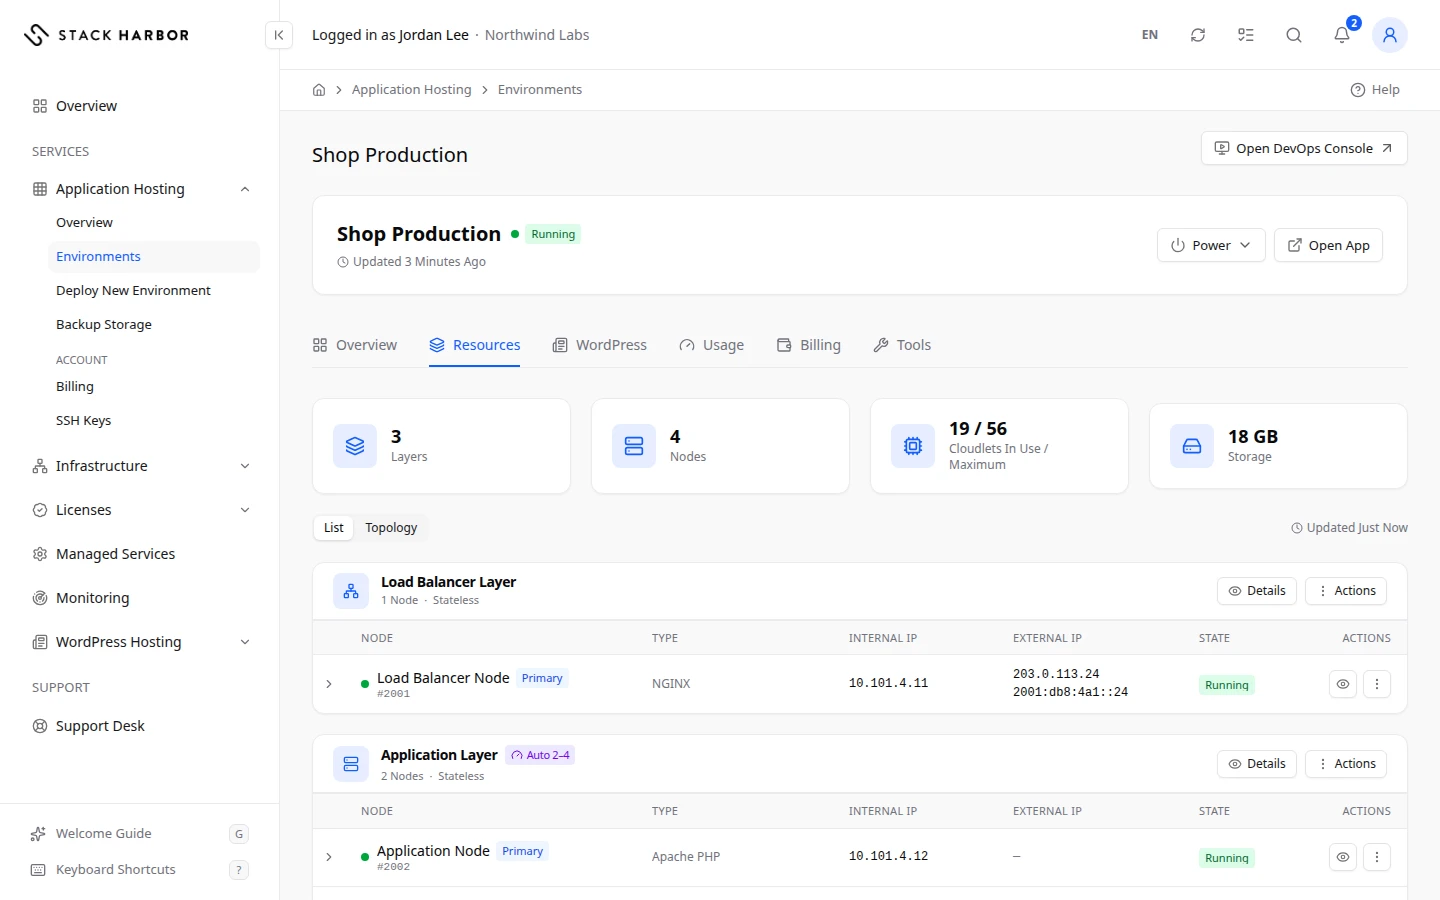
- List shows each layer as a card, with its nodes in a table. The columns are Node, Type, External IP, State and Actions. Expand a node to see its Node Details.
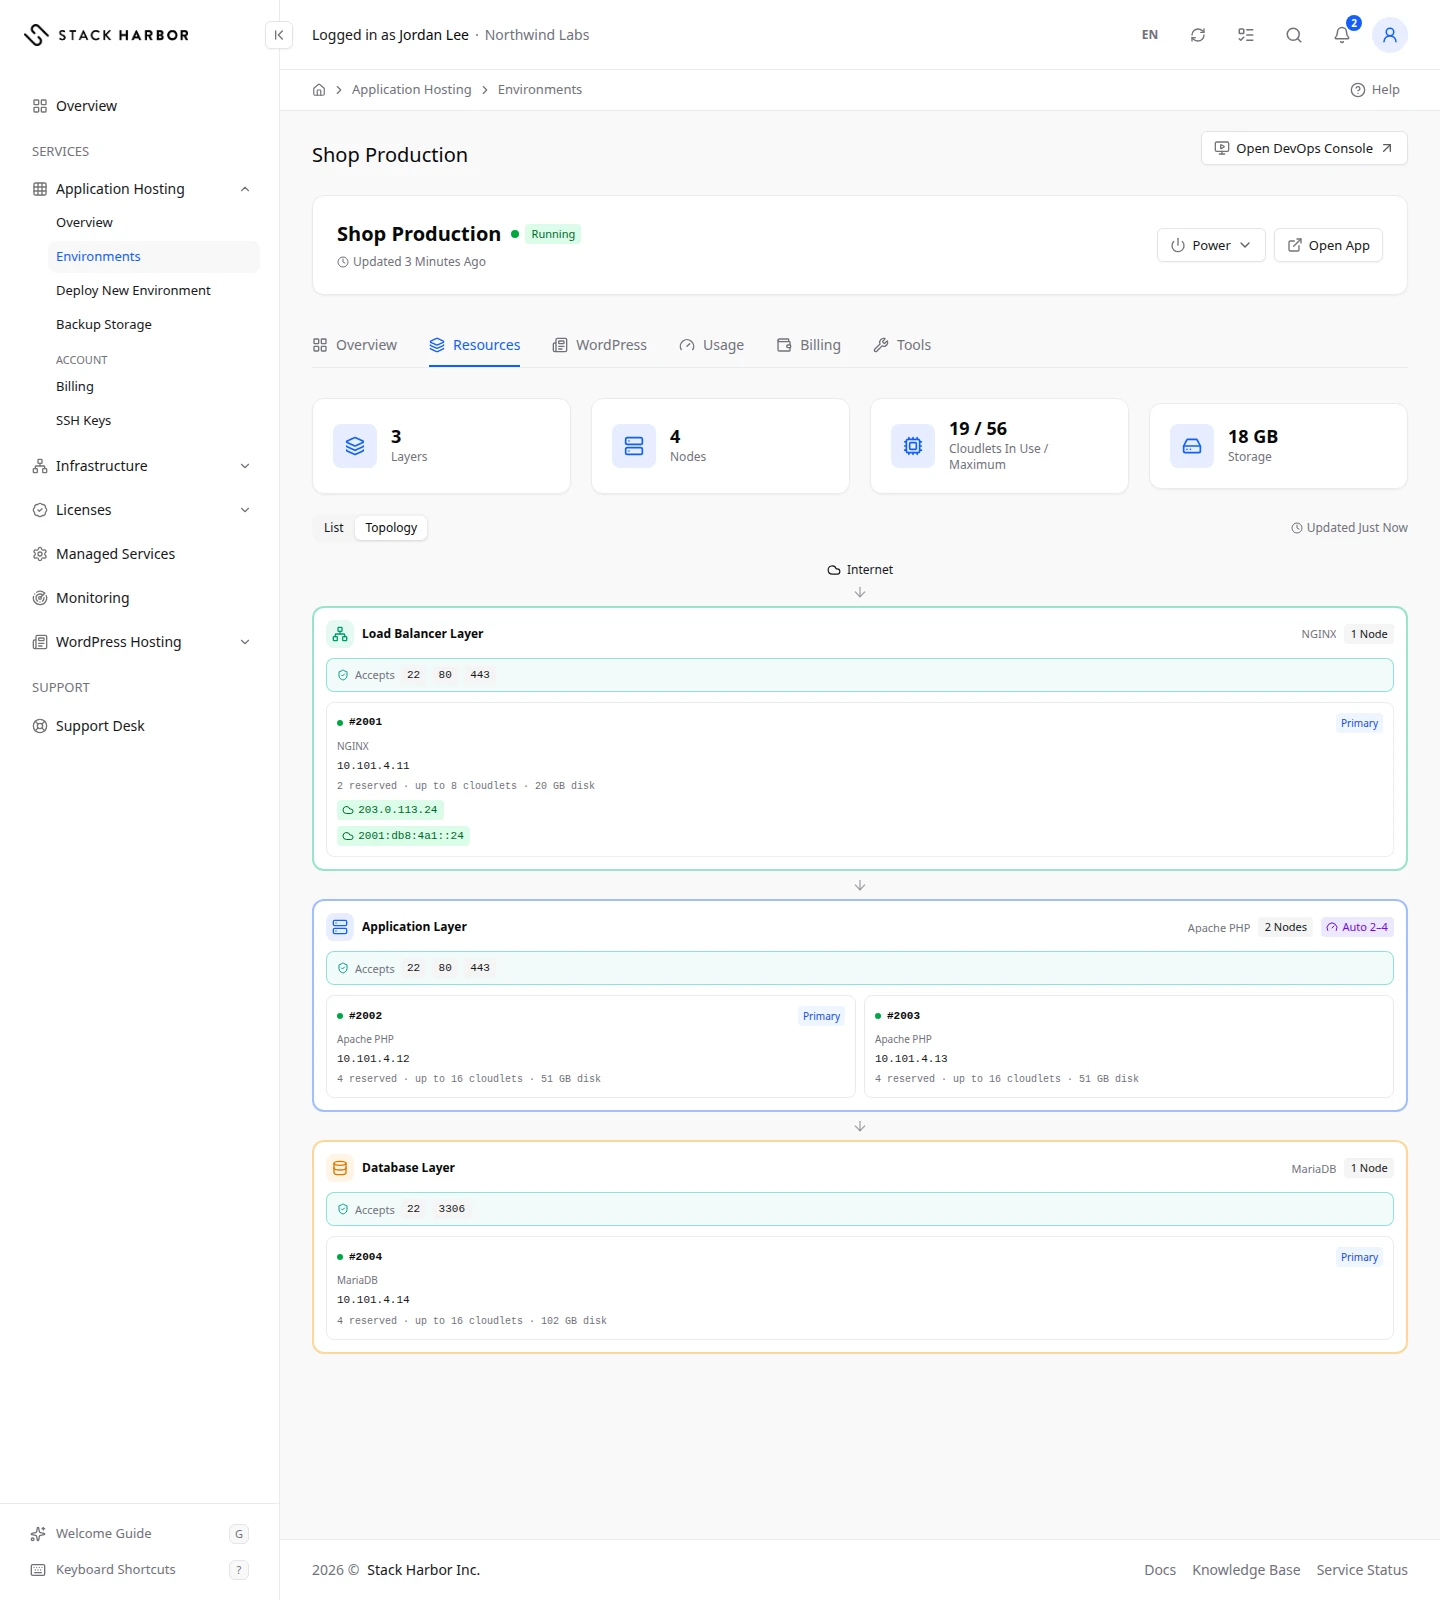
- Topology draws the environment from the internet down through each layer, with the firewall rules each layer accepts.
- The layer card shows the software, the node count, its scaling mode (Stateful or Stateless) and its cloudlets as reserved / maximum.
Resize a layer
- On the layer card, open Actions, then select Resize Layer.
- Set Reserved Per Node and Maximum Per Node. Every node of the layer gets the same size.
- Read the Per Month box. Now and After compare the Reserved Cloudlets, which are billed every hour whether used or not, and At Full Use, the cost if every node used its maximum all month.
- Select Resize Layer.
The resize runs in the background, one node at a time. A running layer keeps serving while it changes.
Change the number of nodes
- On the layer card, open Actions, then select Change Node Count.
- Use the buttons to pick how many nodes run in the layer.
- Select the confirm button. It names the new count, for example Set to 3 Nodes.
When you remove nodes, the newest go first and the primary node always stays. Anything stored only on a removed node is lost. New nodes follow the layer’s Scaling Mode.
Choose how new nodes are made
- On the layer card, open Actions, then select Scaling Mode.
- Choose Stateful or Stateless.
- Stateful makes each new node a copy of the primary node, with its files and settings.
- Stateless starts each new node fresh from the base image. It’s faster, and best when your data lives elsewhere.
- Select Save.
Scale a layer automatically
- On the layer card, open Actions, then select Auto Scaling.
- Tick Scale This Layer Automatically.
- Under Add Nodes, set the CPU level, the minutes it must last, and how many nodes to add. Set the most nodes the layer may reach.
- Under Remove Nodes, set the lower CPU level, the minutes, and how many nodes to remove. The layer never drops below the count you set with Change Node Count.
- Select Save.
A badge such as Auto 2–4 on the layer shows the range it scales in. Check Auto Scaling means the rules aren’t fully set up. Open Auto Scaling, check the values and save them again.
Restart or redeploy a layer or a node
- Open Actions on the layer card, or on a node’s row.
- Select Restart or Redeploy….
- For a restart, confirm with Restart. In a layer with more than one node, nodes restart one at a time, so the layer keeps serving.
- For a redeploy, choose an Image Tag, which is the software version the node is rebuilt on. The tag marked Current is the one in use. Tags marked Not Redeployable can’t be used, usually because they would downgrade data. Confirm with Redeploy.
Open a layer’s page
Select a layer’s name, in the list or the diagram. Its page shows At a Glance with its Nodes, how many are Running, its Cloudlets and its Disk Limit, and a list of its nodes.
From here you can also:
- Select View Layer Usage or Firewall Rules.
- Manage the layer’s Environment Variables. Values stay hidden until you select Show All or a value’s eye button. Use Add Variable to add one, and Reset to Default to put changed values back. Changes apply after the layer restarts.
- On a database layer, select Reset Database Password. The new password for the admin user is shown once, so copy it before you select I’ve Saved It.
- See the layer’s Add-ons. See Install an add-on.
Open a node’s page
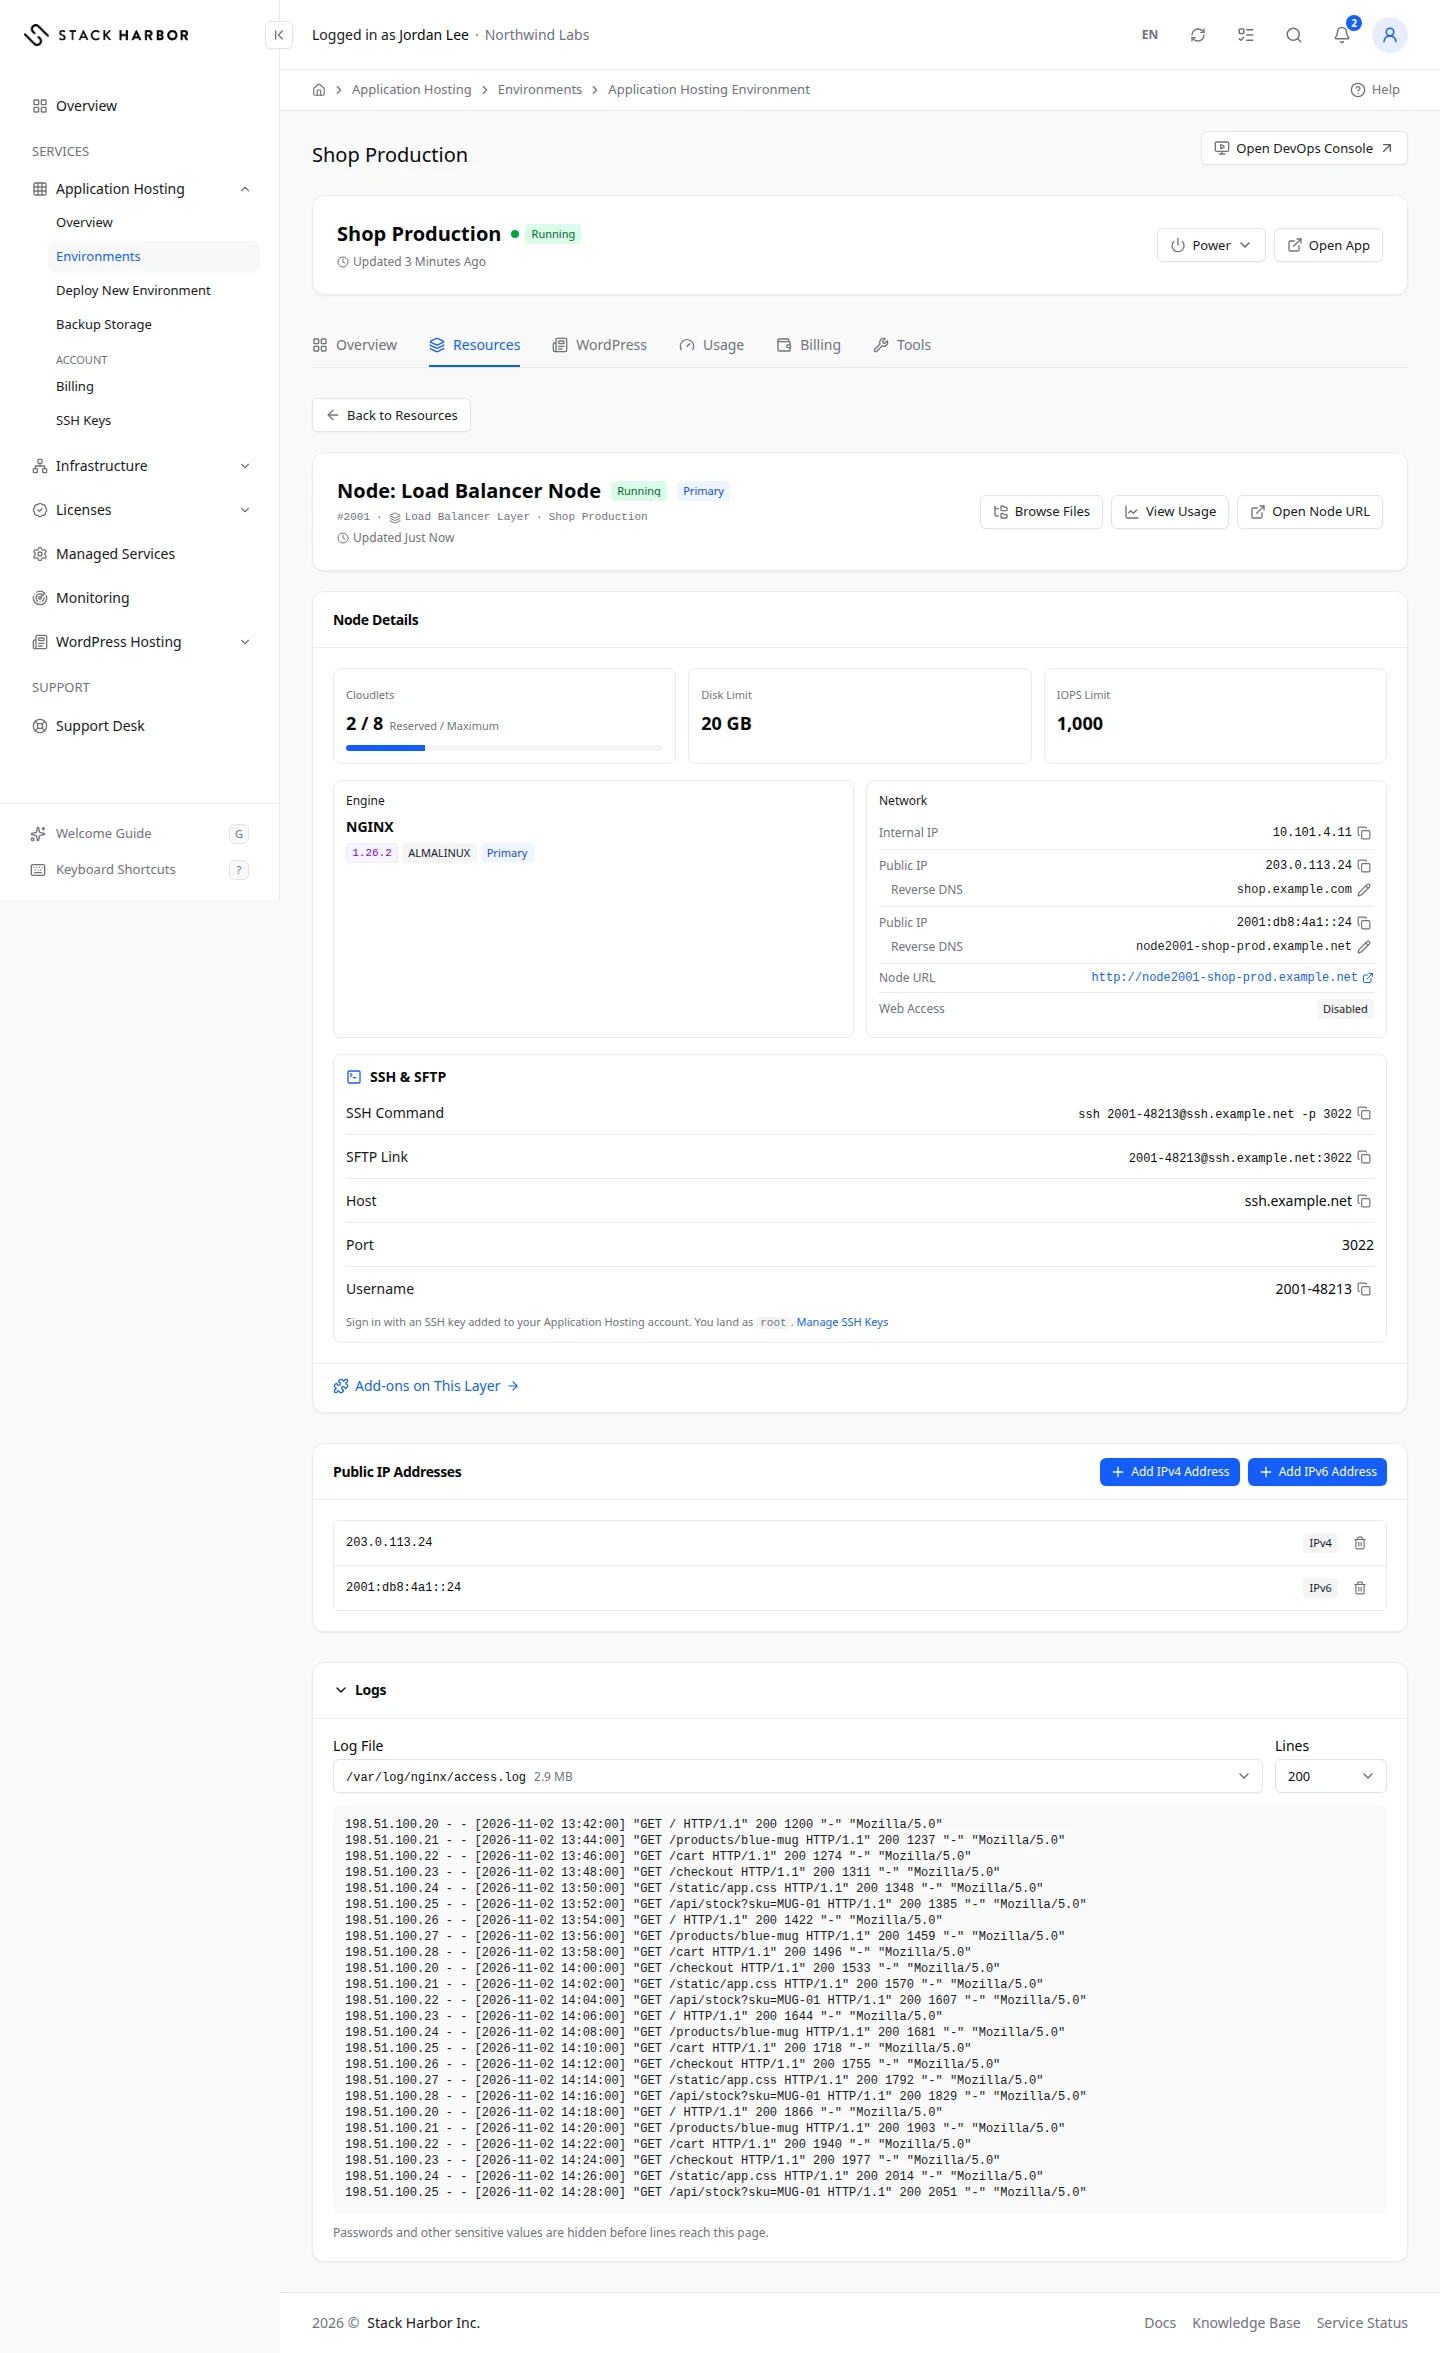
Select a node in the list or the diagram. Its page shows its Node Details, its Public IP Addresses and its Logs.
- Browse Files opens the node’s files, described below. View Usage opens its usage. Open Node URL opens the node’s own address.
- Under Public IP Addresses, select Add IPv4 Address or Add IPv6 Address to give the node a public address. A public IP address is billed according to your plan. Select a remove button to take one away.
- Under Logs, choose a Log File and how many Lines to show. Passwords and other sensitive values are hidden before lines reach the page.
Browse and edit a node’s files
The Files panel lets you look at and change a node’s files without SSH. You can reach your application files and the configuration files of the node’s software. System folders and private keys aren’t shown here.
- Open the environment, then select Resources.
- On a node’s row, open Actions and select Browse Files. You can also select Browse Files on a node’s page.
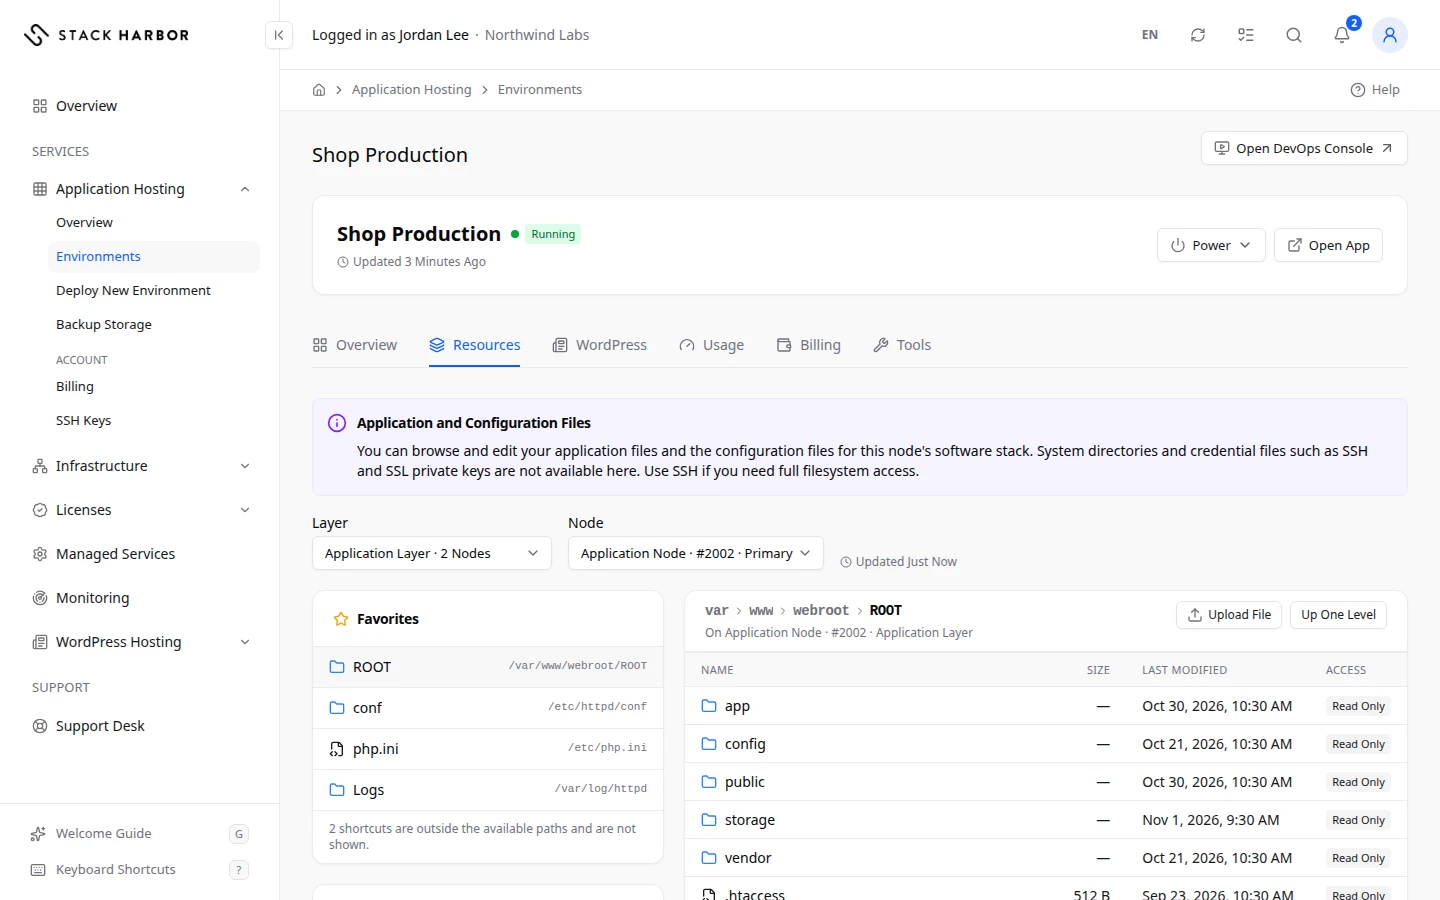
- At the top, pick the Layer and the Node whose files you want. Each node keeps its own files, so a file can differ between two nodes of the same layer.
The environment must be Running. If it isn’t, you see The Environment Is Not Running. Start it from Power, then try again.
- Under Favorites, select a shortcut the node’s software offers, such as its web root. Or select a starting folder under Locations.
- Select a folder to open it. Select Up One Level to go back.
- The table shows each item’s Name, Size, Last Modified date and Access. Read/Write means you can change it. Read Only means you can only look at it. Not Available means it’s outside what this panel can open.
Edit a text file
- Select a file to open it in the editor.
- Make your change. The file shows Unsaved until you save.
- Select Save. You see File saved.
Changes take effect as soon as you save. For a configuration change, you may need to restart the node, as described in Restart or redeploy a layer or a node above.
If you leave with unsaved changes, Lighthouse asks Discard Unsaved Changes? Select Keep Editing to stay, or Discard Changes to leave without saving.
Upload a text file
- Open the folder you want the file in.
- Select Upload File, then choose a text file on your computer.
- If a file with that name exists, choose Replace File to overwrite it, or Keep Existing File.
You can upload text files only. To send binary files or a whole application, put them in an archive and use Deploy From an Archive. See Deploy code to an environment.
If something goes wrong
- Layers Couldn’t Be Loaded means the details couldn’t be read. Try again in a moment.
- That node count is outside what your plan allows. Pick a smaller number, or contact support.
- Your account needs a payment method before it can grow. Add one in Billing. See Add a payment card.
- You don’t have permission for this. The account owner can grant it.
- This layer or node could not be found. It may have been removed. Select Back to Resources.
- You do not have permission to save changes to files. The account owner can grant this. You can browse but not save.
- This file cannot be edited as text. Use SSH to work with binary files.
- This file is too large to open here. Use SSH to work with large files.
- This folder holds more items than can be shown. Use SSH to see all of them.
- The node’s own file permissions do not allow this. The file belongs to a user the panel can’t write as. Use SSH.
- Not on web-01 (the node’s name) means that node doesn’t have that folder. Select the button to go to the node’s starting folder.
Fields and statuses
What each item on this page means, what it does and how to read it.
- Node Column
-
What it is. The node’s name or number.
How to read it. Primary marks the main node of the layer, which is never removed when you scale down.
- Type Column
-
What it is. The software the node runs.
- External IP Column
-
What it is. The node’s public IP address, if it has one.
How to read it. Empty when the node is reached only through the shared entry point.
- State Column
-
What it is. Whether the node is running, stopped, asleep or changing state.
How to read it. Uses the same statuses as the environment.
- Actions Column
-
What it is. Actions for one node.
What it does. Restart, redeploy, browse files, view usage or open the node’s URL.
- List Option
-
What it is. The list view of Resources.
What it does. Shows each layer as a card with its nodes in a table.
- Topology Option
-
What it is. The diagram view of Resources.
What it does. Draws the environment from the internet down through each layer, with the firewall rules each layer accepts.
- Cloudlets Metric
-
What it is. The layer’s cloudlets per node, reserved / maximum.
How to read it. Reserved is always billed. The node can burst up to the maximum.
- Running Metric
-
What it is. How many of the layer’s nodes are running.
How to read it. Healthy when it equals the node count.
- Disk Limit Metric
-
What it is. The disk space each node of the layer can use, in GB.
- Stateful Option
-
What it is. A scaling mode where each new node copies the primary node.
What it does. New nodes start with the primary’s files and settings.
- Stateless Option
-
What it is. A scaling mode where each new node starts fresh from the base image.
What it does. Faster than stateful. Best when your data lives elsewhere, such as in a database layer.
- Resize Layer Option
-
What it is. Changes the reserved and maximum cloudlets of every node in the layer.
What it does. Runs in the background, one node at a time. A running layer keeps serving.
- Reserved Per Node Field
-
What it is. The cloudlets each node keeps at all times.
What it does. Billed every hour, used or not.
How to read it. Must be even and lower than the maximum.
- Maximum Per Node Field
-
What it is. The most cloudlets each node can grow to.
What it does. Cloudlets above the reserved ones are billed only while used.
How to read it. Must be even and higher than the reserved value.
- Per Month Metric
-
What it is. The monthly cost of the layer, before and after your change.
How to read it. Now and After compare Reserved Cloudlets, which are always billed, and At Full Use, the cost if every node used its maximum all month. Estimated from the platform’s hourly prices.
- At Full Use Metric
-
What it is. The monthly cost if every node used its maximum cloudlets all month.
How to read it. A ceiling, not a forecast. You pay less when nodes are not busy.
- LiteSpeed Licence Metric
-
What it is. The LiteSpeed web server licence cost for the layer.
How to read it. Charged per Application Node by its maximum cloudlets. Free up to a set size, then a monthly amount per node.
- Change Node Count Option
-
What it is. Changes how many nodes run in the layer.
What it does. New nodes follow the scaling mode. Removing nodes takes the newest first and keeps the primary. Data stored only on a removed node is lost.
- Application Nodes Option
-
What it is. On a WordPress layer, how many Application Nodes run the site behind its load balancers.
What it does. A new node is copied from the first one and takes about 8 minutes. It can also set the automatic scaling limit.
- Auto Scaling Option
-
What it is. Rules that add nodes under load and remove them when it is quiet.
What it does. Watches CPU and changes the node count within the range you set.
How to read it. A badge such as Auto 2–4 shows the range.
- Add Nodes Field
-
What it is. The rule for adding nodes.
What it does. When CPU stays above the level you set for the minutes you set, adds the number of nodes you set, up to the maximum.
How to read it. CPU from 5% to 95%, minutes from 1 to 60, steps from 1 to 4.
- Remove Nodes Field
-
What it is. The rule for removing nodes.
What it does. When CPU stays below the level you set, removes nodes, but never below the count set with Change Node Count.
How to read it. The remove level must be lower than the add level.
- Check Auto Scaling Status
-
What it is. The layer’s auto scaling rules are not fully set up.
What it does. It may not scale as expected.
How to read it. Open Auto Scaling, check the values and save them again.
- Restart Option
-
What it is. Restarts a layer or one node.
What it does. In a layer with several nodes, nodes restart one at a time so the layer keeps serving. A single node is briefly unavailable.
- Redeploy… Option
-
What it is. Rebuilds a layer or a node on another version of its software.
What it does. Recreates the nodes on the image tag you choose. Expect a brief interruption.
- Image Tag Field
-
What it is. The software version a redeploy rebuilds the node on.
How to read it. Current is the tag in use. Not Redeployable tags are greyed out, usually because they are downgrades the data could not survive.
- Environment Variables Field
-
What it is. Settings passed to the software of every node in the layer, as name and value pairs.
What it does. Changes apply after the layer restarts.
How to read it. Values stay hidden until you show them, since some are passwords. Reserved marks one set at creation that cannot change. Changed marks one that differs from the default.
- Reset Database Password Option
-
What it is. Sets a new password for a database layer’s admin user.
What it does. Changes the live password at once. Anything using the old one stops connecting until updated.
How to read it. The new password is shown once only.
- Disk Limit Field
-
What it is. The disk space this node can use.
- IOPS Limit Field
-
What it is. The most disk reads and writes per second this node can make.
- Engine Field
-
What it is. The software and version the node runs.
- Node URL Field
-
What it is. The node’s own web address.
What it does. Open Node URL opens it, bypassing the load balancer.
- Web Access Field
-
What it is. Whether the node’s own URL answers web requests.
How to read it. Enabled or Disabled.
- Reverse DNS Field
-
What it is. The host name a public IP address points back to, also called a PTR record.
What it does. Mail servers often check it. Edit it beside the address.
- Public IP Addresses Field
-
What it is. The public IPv4 and IPv6 addresses on this node.
What it does. Add gives the node a new public address. Remove takes one away, and you may not get the same address back.
How to read it. Each public IP address is billed according to your plan.
- Logs Field
-
What it is. The node’s log files.
What it does. Shows the last lines of the log file you pick.
How to read it. Passwords and other sensitive values are hidden.
- Layer Field
-
What it is. The layer whose node files you browse.
- Node Field
-
What it is. The node whose files you browse.
What it does. Each node keeps its own files, so a file can differ between two nodes of one layer.
How to read it. A stopped node is marked stopped.
- Favorites Field
-
What it is. Shortcuts to important folders that the node’s software offers, such as its web root.
What it does. Opens that folder.
- Locations Field
-
What it is. Starting folders you can browse from.
- Name Column
-
What it is. The file or folder name.
What it does. Select a folder to open it, or a file to open it in the editor.
- Size Column
-
What it is. The size of the file.
- Last Modified Column
-
What it is. When the file was last changed.
How to read it. Shown in your account’s time zone.
- Access Column
-
What it is. What you can do with the item here.
How to read it. Read/Write means you can change it. Read Only means you can look only. Not Available means it is outside what this panel can open.
- Unsaved Status
-
What it is. The open file has changes you have not saved.
How to read it. Select Save to keep them.